Welcome to Mary: your onboarding guide
Last updated: September 25, 2026
Last updated: September 2026
Set up Mary for your firm · Start your first matter
What's inside
Part A · Admin setup: A1 Security and IT approval, A2 Microsoft Entra consent, A3 Create the organization, A4 Invite users, A5 Roles, A6 Billing and credits, A7 Optional firm setup, A8 Integrations, A9 Offboarding
Part B · Your first matter: B1 Sign in, B2 Create a matter, B3 Upload documents, B4 Check the index, B5 Find your way, B6 Create a chronology, B7 Review and verify, B8 Go further, practical tips
Part C · Key capabilities: C1 Bring in the matter, C2 Integrations, C3 Organize documents, C4 Matter context, C5 Chronologies, C6 Drafting, C7 Questions, C8 Financial analysis, C9 Verification and risks, C10 Collaboration, C11 MCP
Welcome to Mary
Mary is the factual record for litigation. Disputes are won, lost or settled on the facts, and Mary helps your team build a reliable fact record for each matter. You can then work from that record, checking the evidence as you go.
Mary works in four stages:
Stage | What happens |
|---|---|
01 · Read and organize | Mary processes your documents, identifies individual documents within bundles, then names and categorizes them. Check processing and document coverage before relying on the resulting record. |
02 · Work products | When you make a request, Mary uses the matter's documents to build the work you need: for example, a chronology about a particular issue or an answer about a required procedure. Relevant new documents can lead to proposed updates for supported chronologies. Check other work separately. |
03 · Verify | Follow citations to the supporting source and review flags such as contradictions and gaps. Your team verifies the record instead of taking the output on trust. |
04 · Deeper interrogation | Ask further questions to test and develop your understanding of the matter. Check the context and sources behind each answer as the matter develops. |
Throughout, your lawyers keep the judgment. Mary's role is to surface evidence, risks, gaps in coverage and ambiguity so your team can make the final calls.
This handbook takes you through the complete onboarding journey. Part A is for your Mary administrators and IT team. Part B takes an invited user from sign-in to a first reviewed chronology. Part C explains the capabilities you can use next.
Mary runs separate regional platforms. Use your firm's region and onboarding invitation; the links at the end distinguish Australia and the United States. Capabilities and connections can depend on your organization's setup. Check the help center for current task instructions and agree product-update communications with your Mary contact.
Before you start
Name the people responsible for onboarding and choose a useful first matter. Run security review, IT approval and document preparation in parallel where possible. Agree a realistic timetable with Mary; the example below is a planning aid, not a fixed service commitment.
Who does what
Role | Who at the firm | Responsibilities |
|---|---|---|
Mary administrator(s) | A small core group, often 2–5 people from innovation, practice support, knowledge or litigation support | Creates the organization, invites users, manages roles, monitors usage and applicable billing controls, and acts as the firm's main Mary contact. |
IT / Microsoft Entra administrator | A Global Administrator or Cloud Application Administrator for Microsoft firms | Completes Microsoft consent; manages assignments, MFA and Conditional Access under firm policy. |
Security / risk / procurement | The firm's security or risk team | Reviews Mary's security documentation and approves use. |
Pilot or matter leads | One lead per practice group or matter team | Chooses the first matter, prepares documents and collects team feedback. |
Users | Lawyers, paralegals, junior associates and support staff | Create matters, upload documents, and create and check work products. |
Mary contact role | Purpose |
|---|---|
Customer success contact | Day-to-day onboarding, training, check-ins and help with adoption. |
Account contact | Commercial terms, credits and plan changes. |
Product or practice contact, where arranged | Workflow design, matter-specific use cases and product feedback. |
Keep administration continuous. Consider a shared administrative mailbox or distribution list, such as mary-admins@your-firm.example, and agree with Mary where administrative correspondence should go. Confirm the actual contacts for your engagement. |
An example onboarding timeline
Stage | Example timing | What happens |
|---|---|---|
Kickoff | Week 0 | Agree objectives, pilot group, first matters and success measures; exchange contacts. |
Security review | Weeks 0–1, in parallel | Security reviews the current Trust Centre documents (A1). |
Account and SSO setup | Week 1 | IT completes relevant consent; the first Mary administrator creates the organization and invites users (A2–A4). |
Admin session | Week 1 | A 45–60 minute walkthrough covering user and matter management and the rollout plan. |
First-matter preparation | Weeks 1–2 | Prepare and upload the matter, agree document organization and build example outputs (Part B). |
Team training | Week 2 | A 45–60 minute session per practice group or matter team, using its own matter where appropriate. |
First check-in | Week 3 | Help with initial use cases and gather feedback. |
Check-ins every two weeks | Weeks 4–6 | Pilot lead and frequent users review progress against objectives. |
Review and next steps | Weeks 6–8 | Discuss feedback and value, then decide on broader rollout. |
Ongoing check-in | Monthly, by arrangement | Review usage, new capabilities and product feedback. |
Agree these sessions and dates with Mary. Preparing a chronology or other useful output on the team's chosen matter before training makes the session more concrete. Follow group training with short individual sessions where users need help applying the workflow.
Part A · Admin setup
For your Mary administrators and IT team. The order matters: complete security and sign-in approval, have one administrator create the organization, then invite everyone else.
Security review can start during procurement. Allow for your firm's approval process rather than assuming the same setup time for every organization.
A1 · Security review and IT approval
Most firms need security or risk sign-off before IT approves a new application. Start this work at kickoff.
Ask security to review Mary's current security documents and sub-processor list in the Mary Trust Centre.
Use the questions below to record the firm's review. Ask your Mary contact for documents or answers required by procurement.
Ask IT to allow the domain for your firm's Mary region through applicable web filtering. For the United States platform this is us.marytechnology.com; use the correct regional domain from your onboarding instructions.
Common question | What to check |
|---|---|
Legal entity | Mary Technology is the trading name of DEA Technology Pty Ltd. Match the entity to your agreement. |
Which AI models? | Review the current model-provider and sub-processor information. The model used can depend on the task; obtain the current deployment details rather than relying on a historic model list. |
Is our data used to train models? | Confirm the applicable training commitments in Mary's current security documentation and your agreement. |
Where is data stored? | Confirm the region of the Mary platform your firm uses and the residency commitments that apply to it. |
Retention by model providers | Review the applicable provider-retention and abuse-monitoring arrangements for your deployment. These are separate from retention of your matters in Mary. |
How can generated findings be checked? | Follow citations to the source page or location, read the surrounding context and check coverage and flags. A citation is a checking route, not a guarantee of correctness. |
Human review | Have a suitably qualified legal professional check work before relying on it, and follow your firm's policy and agreed terms. |
Sub-processors and changes | Review the Trust Centre's current list and confirm how the firm will receive material-change notices. |
A2 · Approve Mary in Microsoft Entra ID
For the firm's IT administrator when using Microsoft sign-in. Mary supports federated Microsoft sign-in and also Google Workspace sign-in. The Microsoft procedure below does not apply to firms using Google.
The Microsoft connection uses standard administrator consent; it does not require your team to exchange application secrets or certificates with Mary as part of this flow. Use your firm's approved account and regional onboarding link.
A Global Administrator or Cloud Application Administrator opens the onboarding sign-up link and selects Sign in with Microsoft. For the US platform, the first-administrator route is US organization setup.
In Microsoft's consent prompt for Mary, review the requested permissions.
If approved under firm policy, select Consent on behalf of your organization, then Accept.
Check Mary under Enterprise Applications in the Entra admin center. Subsequent users sign in subject to the firm's application assignments and sign-in policies.
IT can manage access to specific users or groups, enforce MFA and Conditional Access, audit sign-in logs, and revoke consent or disable the application. A pilot group can help limit initial access. If Mary is missing from Enterprise Applications, check the intended tenant, consent and assignments rather than assuming setup has completed.
IT can stop after consent if another person will administer Mary day to day. That named Mary administrator completes A3. Do not invite the wider team until the firm's organization is ready.
A3 · Create the firm's Mary organization
One named administrator creates the organization. Everyone else joins by invitation.
Open the sign-up link supplied by Mary for your region. For the US platform, use US organization setup. This is the first-administrator sign-up route, not the routine login page.
Select Sign in with Microsoft or the supported Google option and use your work account.
Enter the firm's details to create the organization.
Tell your Mary contact that setup is complete so Mary can confirm the administrator, apply the contracted plan and credits, and enable agreed features such as an optional document naming convention.
Do not ask invited users to repeat organization creation. If the first administrator encounters a sign-in problem, check the onboarding route and account with Mary before creating another organization.
A4 · Invite users
Open Settings → Organisation in your firm's Mary platform.
Add colleagues using their work email addresses and select the appropriate role. Choose User for ordinary team members and Admin for the firm's administration group.
Ask each person to open their invitation and sign in with the same invited work account.
Three checks prevent common access problems:
Invite first, sign in second. A person who signs up independently may create a separate organization. Ask Mary to resolve an organization mismatch; do not delete an account or its work as a troubleshooting step.
Accept the invitation promptly. Invitation links expire after 48 hours. If the link has expired, ask an administrator to resend it.
Match the work account. The email and sign-in method must match the invitation and your firm's identity setup.
Firm seats and matters are unlimited under the standard model; usage is measured in processed pages. Confirm any contract-specific terms with your account contact.
A5 · Roles and permissions
Use the least access needed for each person's work. Keep the Admin role to the core administration group. Use this table to plan access:
Capability | Admin | User / Team Member |
|---|---|---|
Invite or remove organization members and change their roles | Organization administration responsibility | Not an ordinary-member responsibility |
See matters | Organization-wide administration access | Matters they created and matters shared with them |
Manage plan, billing and usage | Applicable admin controls, depending on the plan | Ask an administrator for billing help |
Create matters and upload documents | Yes | Yes, within their available account access |
Invite colleagues to a matter | Use the available matter-sharing controls | Use the available matter-sharing controls for matters they can access |
Create chronologies, drafts and source questions | Available tools for the matter | Available tools for the matter |
Agree matter names and a Matter ID format at the start so work can be found and linked to the firm's billing reference. Organization membership and access to an individual matter are different: check both when a colleague cannot see work.
A6 · Billing, usage and credits
Open Billing from the application sidebar if your role has access. Available panels and controls depend on the firm's plan or agreement. Where offered, Billing Overview, Credit Usage and Billing Alerts help administrators review spending and usage.
Check the included allowance and applicable spending controls. On plans using Billing Limit, that limit is the maximum monthly spend and cannot be lower than the plan cost. A configured spend alert sits between the plan cost and the Billing Limit. Supported billing alerts notify organization admins; check which alerts are enabled for your firm.
Add the firm's matter number as the optional Matter ID when creating a matter. Use the usage reporting available to your plan to support internal allocation or client billing; confirm the required reporting with Mary.
One credit is deducted per page after it fully processes. Selecting Process or Finish & Generate starts processing; the click itself is not the charge point. Further Mary work on those processed pages is included. Spreadsheet page equivalents are estimates. Re-uploading, retrying or copying material is a separate processing question—ask support about a disputed charge instead of assuming a refund or free reprocessing.
For invoiced or custom plans, use the agreed commercial terms. See credits, usage and spending guidance for the task guide.
A7 · Firm-specific setup
These options can be agreed before the first matter. Firms that do not need them can continue to Part B.
Document naming and organization. If your firm wants its own scheme, send Mary the categories and subfolders, the rule for placing a document in each, and naming requirements such as retaining an e-discovery or DMS document ID. Mary can discuss and enable the convention for your firm. If enabled, users choose the Naming convention at Conventions, between Sources and Summary, during matter setup. Otherwise skip that step. Discuss changes to an existing matter with Mary before recreating or re-uploading anything.
Precedents and house style. Agree drafting templates and share chronology column preferences or examples. Organization admins can upload firm drafting templates. A drafting template and a document naming convention serve different purposes; do not assume one configures the other.
Client or matter approval. Check whether the client or firm requires permission before its documents are processed using AI tools. Obtain any required approval before choosing and uploading the first matters.
A8 · Integrations
Connections are optional and depend on your firm's provider environment and enablement. Check the intended tenant, workspace, library or matter before selecting documents.
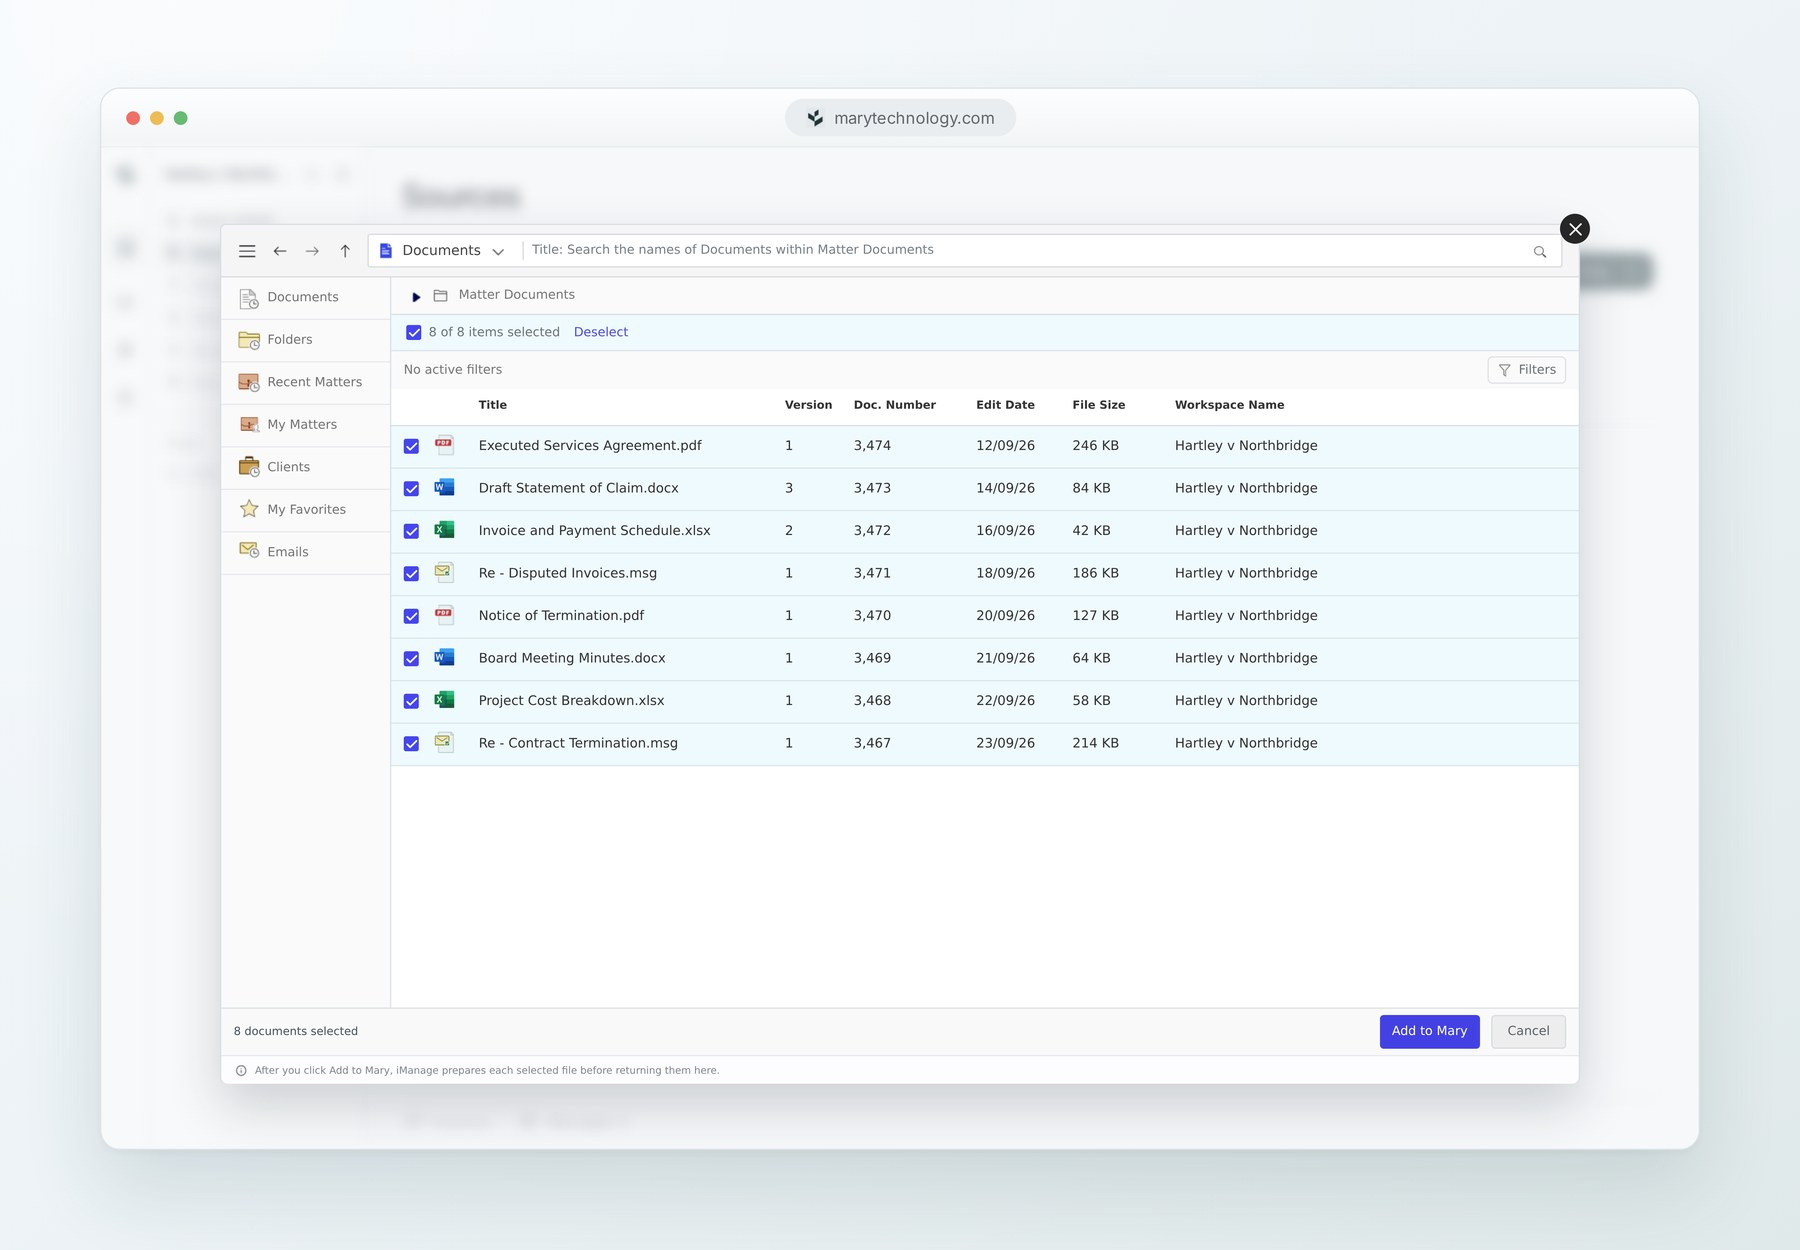
Source illustration: select the intended documents in the iManage picker.
Integration | Type | What your team can do | Setup responsibility |
|---|---|---|---|
iManage Work | Document management | Browse and search workspaces, import documents, and use supported export-back options. | iManage administrator setup, Mary enablement, then each user's connection. |
NetDocuments | Document management | Add selected documents from NetDocuments. | Firm enablement and each user's supported connection/picker. |
Actionstep | Practice management | Bring matter documents into Mary. | Firm enablement and each user's connection. |
Smokeball | Practice management | Bring matter documents into Mary. | Firm enablement and each user's connection. |
Google Drive | Cloud storage | Select files from Drive for import. | Authorize the supported connection when prompted. |
Microsoft OneDrive | Cloud storage | Select files from OneDrive for import. | Authorize the supported connection when prompted. |
Claude | AI assistant | Use available Mary matters and tools from Claude. | A workspace owner enables the connector where required; each user connects their Mary account. |
ChatGPT | AI assistant | Use available Mary matters and tools from ChatGPT. | Available in the United States; workspace policy and each user's installation apply. |
Document management and cloud storage
For an enabled document-management connection, open Settings → Integrations, choose the system's connection control and authorize with your provider account. Use + Add files in a matter to choose the connected source. Provider setup and available destinations differ; importing is separate from exporting work back.
For Google Drive and OneDrive, the established route is matter → + Add files → provider → authorize if prompted → select files → review → Process. You may be asked to authorize the first time you choose the source. Do not assume an import creates ongoing synchronization with later provider changes.
Connect Claude
Mary is installed from Claude's connector directory, not from Mary's integration settings.
If your Team or Enterprise workspace requires owner approval, ask its owner to make Mary available through the workspace's connector settings.
Open Claude's Settings → Connectors → Browse connectors. Claude may offer connector management through its customization or chat controls; use the Mary directory listing available in your client.
Find Mary, choose Connect, and sign in with your Mary work account.
Complete the authorization, then ask Claude to use Mary. For example: “Using Mary, what does the chronology on the Smith matter say about the March 2024 board meeting?”
Connect ChatGPT
The Mary ChatGPT plugin is available in the United States. Use the directory route available to your ChatGPT account.
If you use a managed workspace, ask its administrator to make the Mary plugin/app available under the workspace's policies.
Open Plugins, find Mary, and select Install or Install plugin, as shown.
When prompted, select Connect and sign in with your Mary account.
Select Mary in the conversation's tool picker or use its supported mention control, then ask your question.
Both clients operate within the access of the connected Mary account. See the Mary MCP guide for current client-specific instructions. Directory installation is the normal route; this handbook does not require a manually entered server URL.
iManage Work administrator setup
Agree setup timing with Mary and the firm's iManage administrator.
Provide Mary with the firm's iManage customer name and ID, whether the tenancy is single- or multi-tenant, and any custom domain.
Ask Mary to confirm its side of the integration is enabled.
In iManage Control Center → Applications → + Add Application, find Mary Technology – Integration App.
Review authentication settings with IT under firm policy. Confirm any recommended access-token and refresh-token periods with Mary rather than copying a duration from another firm's setup.
Configure access for All users or an appropriate pilot group.
Review the configuration and select Finish when approved.
Each user connects their own account in Mary's integration settings.
On-premises or imanage.work environments may need Mary to configure the firm's domain first. If support requests a browser diagnostic file, follow the firm's secure handling procedure: such files can contain account or document information.
Users can also upload files from their computer or an accessible shared folder. For e-discovery platforms, export the appropriately culled set and upload it to Mary.
A9 · Offboarding a user
Before removing access, identify the person's matters and the colleagues who need continued access. Ask the user to share necessary work where appropriate, and agree any ownership or continuity steps with the administrator and Mary.
Use the approved organization administration process under Settings → Organisation to remove membership. IT should also remove applicable sign-in assignments or group access. Check for other assignments rather than assuming removal from one group blocks every route.
Before removing access, ask Mary how ownership and existing links will be affected. For the receiving team, confirm that the necessary matters and work are visible.
Part B · Getting started on your first matter
For everyone using Mary on a matter. Start with your invitation and a useful, approved document set. Processing time depends on the material and its quality; check the sources you need show Done before creating work.
B1 · Accept your invitation and sign in
Open the invitation email from Mary and follow its link promptly. If it has expired, ask your administrator for a new invitation. Invitation links expire after 48 hours.
Choose the sign-in method used for your invited work account: Microsoft or Google, as applicable.
Bookmark the login for your firm's region: Mary Australia or Mary United States.
If you see “An account already exists with the same email address but different sign-in credentials”, return to the login page and use the original sign-in method for that account. For an account created with Microsoft, choose Microsoft. Ask your administrator or Mary support if the problem continues. Do not create another organization or ask for account deletion as the first remedy.
Wait for the invitation. Only the first named administrator creates the firm's organization. An invited user joins that existing organization. |
B2 · Create a matter
From the matter home page, select New matter.
Enter a clear matter name, choose the Area of law, and optionally add the firm's matter number in Matter ID. The ID helps connect usage and work to the firm's reference.
Add and review the source documents using steps 1–2 in B3, then continue the setup below before starting processing.
If your firm has an enabled naming convention, choose it at Conventions, between Sources and Summary. Otherwise skip that step.
At Summary, add or check the matter context. Include who the firm acts for, the key parties, issues and background. Use Key documents / Add documents and Additional context where appropriate.
Select Finish & Generate when the setup is complete to start processing. Invite relevant colleagues through the matter's sharing controls so they can work with you.
The matter's Summary provides context. A work product's Details tab provides information about that particular output; these are different places. If context changes, check affected work rather than assuming all saved outputs update automatically.
B3 · Upload documents
Upload the documents the matter team needs. For large sets, cull first in the e-discovery or document-management system. A focused set is easier to check than an entire unrelated data room.
Select + Add files. Drag in supported files, folders or ZIP archives, choose them from your computer, or select an enabled connected source.
Review the detected files. Resolve warnings, rejected files and duplicates in Needs attention. Mary shows reasons for material it cannot process.
For a new matter, first finish the Conventions and Summary steps in B2, then select Finish & Generate. For an existing matter, select Process.
Return to Sources to check progress and completion. Ready is not the same as Done.
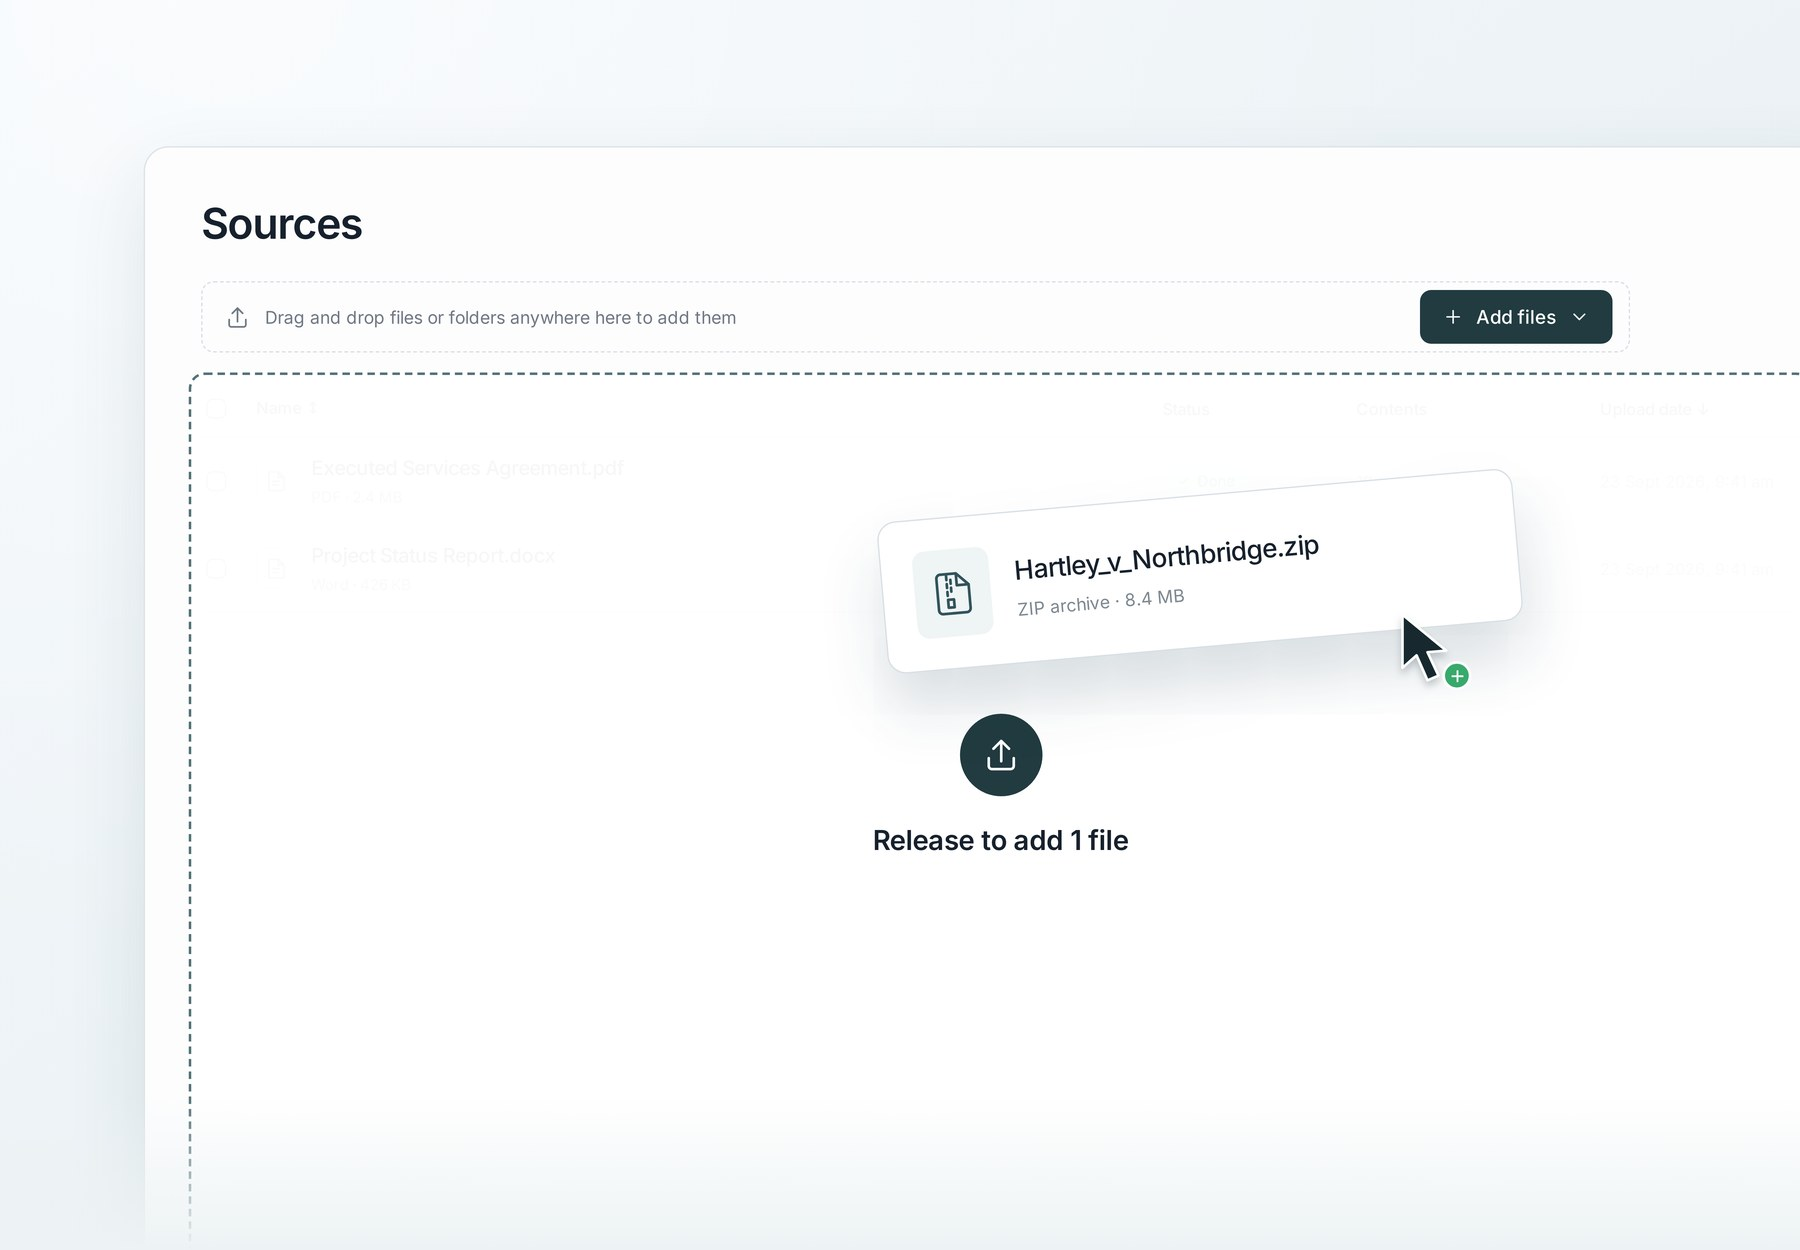
Add supported files, folders or ZIP archives on the Sources page.
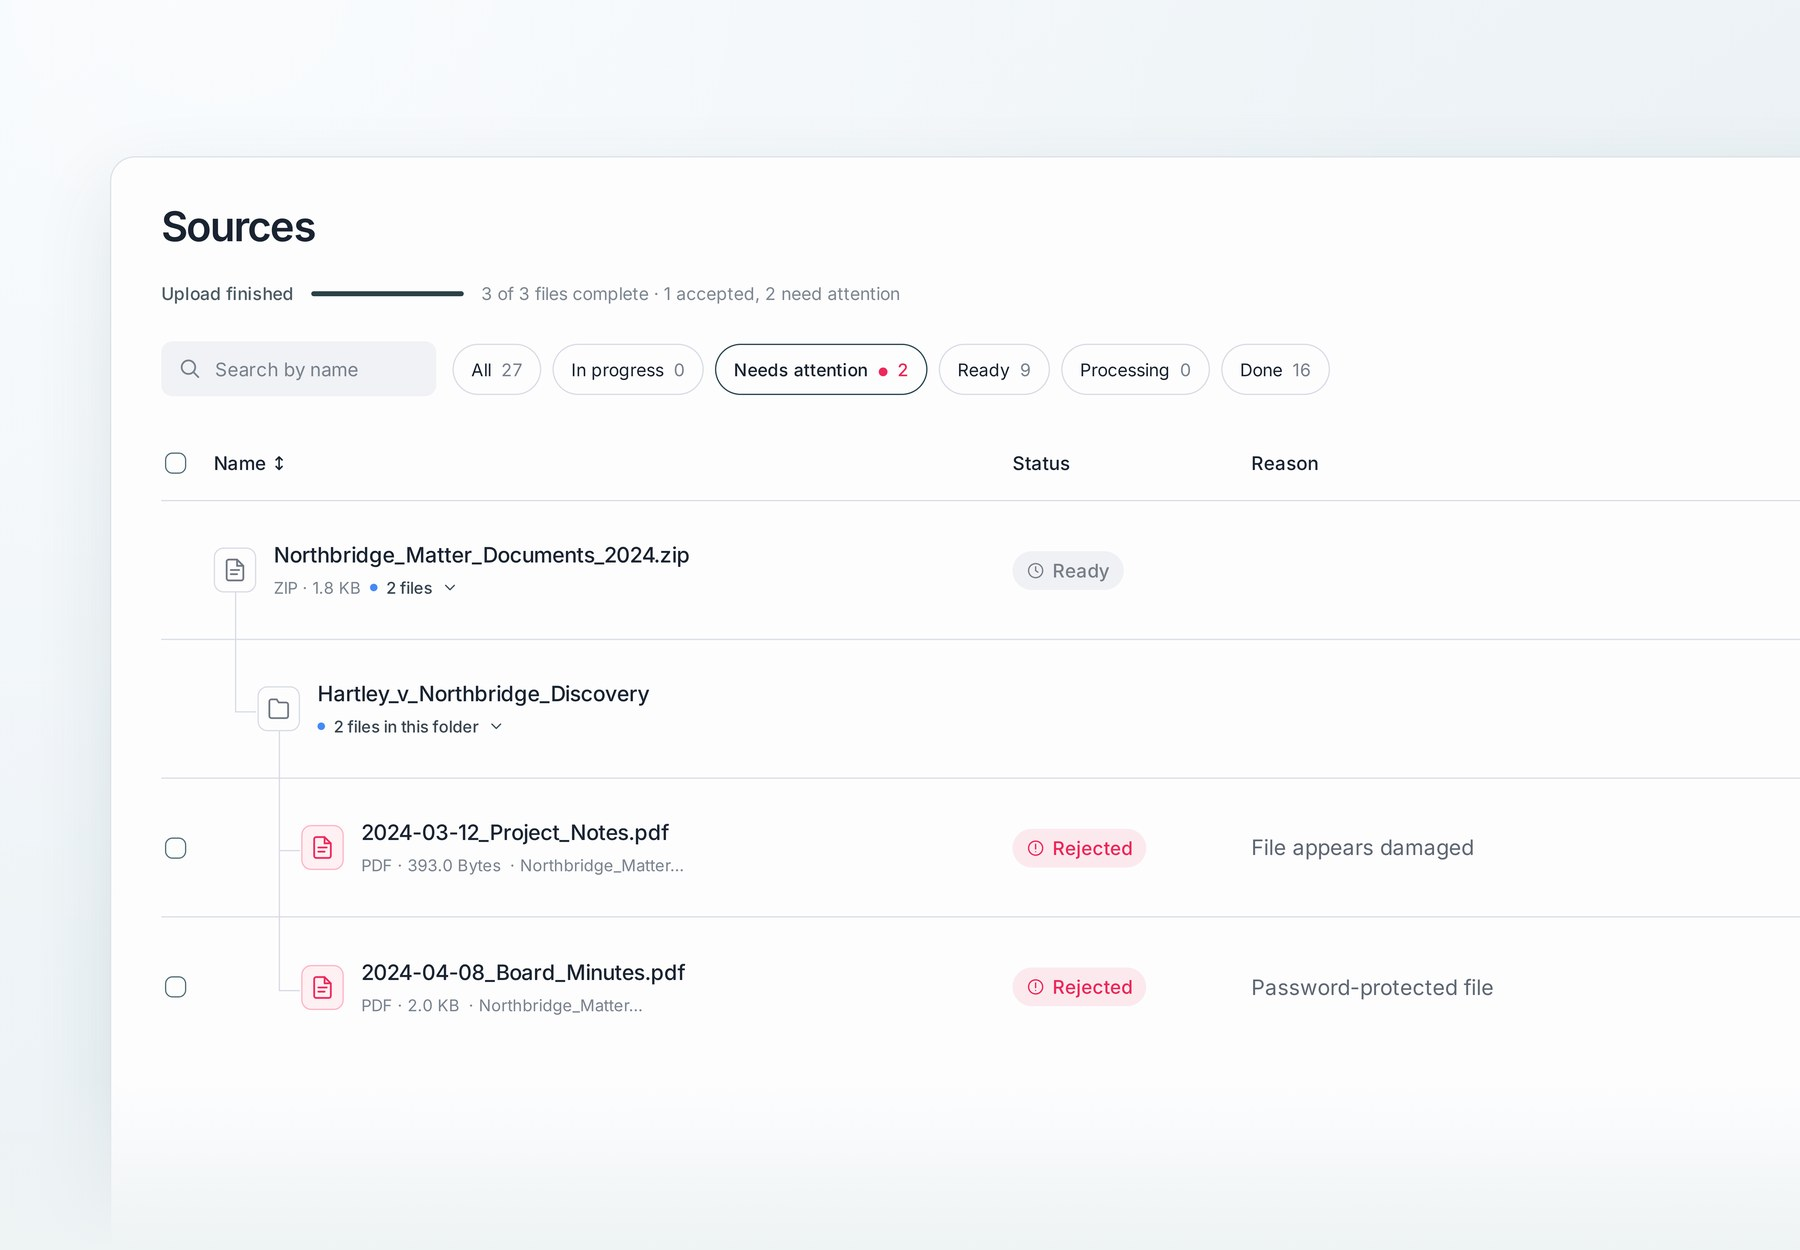
Read the reason in Needs attention before starting processing.
If a temporary connection problem interrupts an upload, Mary attempts to resume it. Return to the matter and check its actual state rather than uploading a duplicate immediately.
Mary supports PDF, Word, email, spreadsheets, ZIP archives and images. The maximum processing batch is 50,000 pages; see C1 for formats and the other limits. Generated index names are distinct from original source filenames and folder paths. Check both when tracing a document back to the material received.
B4 · Check the Document index
After processing completes, open Document index. Review the identified documents before creating outputs:
Confirm that the expected documents and date ranges are present.
Check names, descriptions and classifications against the original source.
Open the source reference and page range to check where an identified document appears within a bundle.
Correct supported editable index details where needed. Do not assume every source field or classification has the same editing control.
If preparing a bundle, apply the intended filters and choose the export offered for the index or sub-documents. Check filenames, order, pagination and included documents in the resulting file.
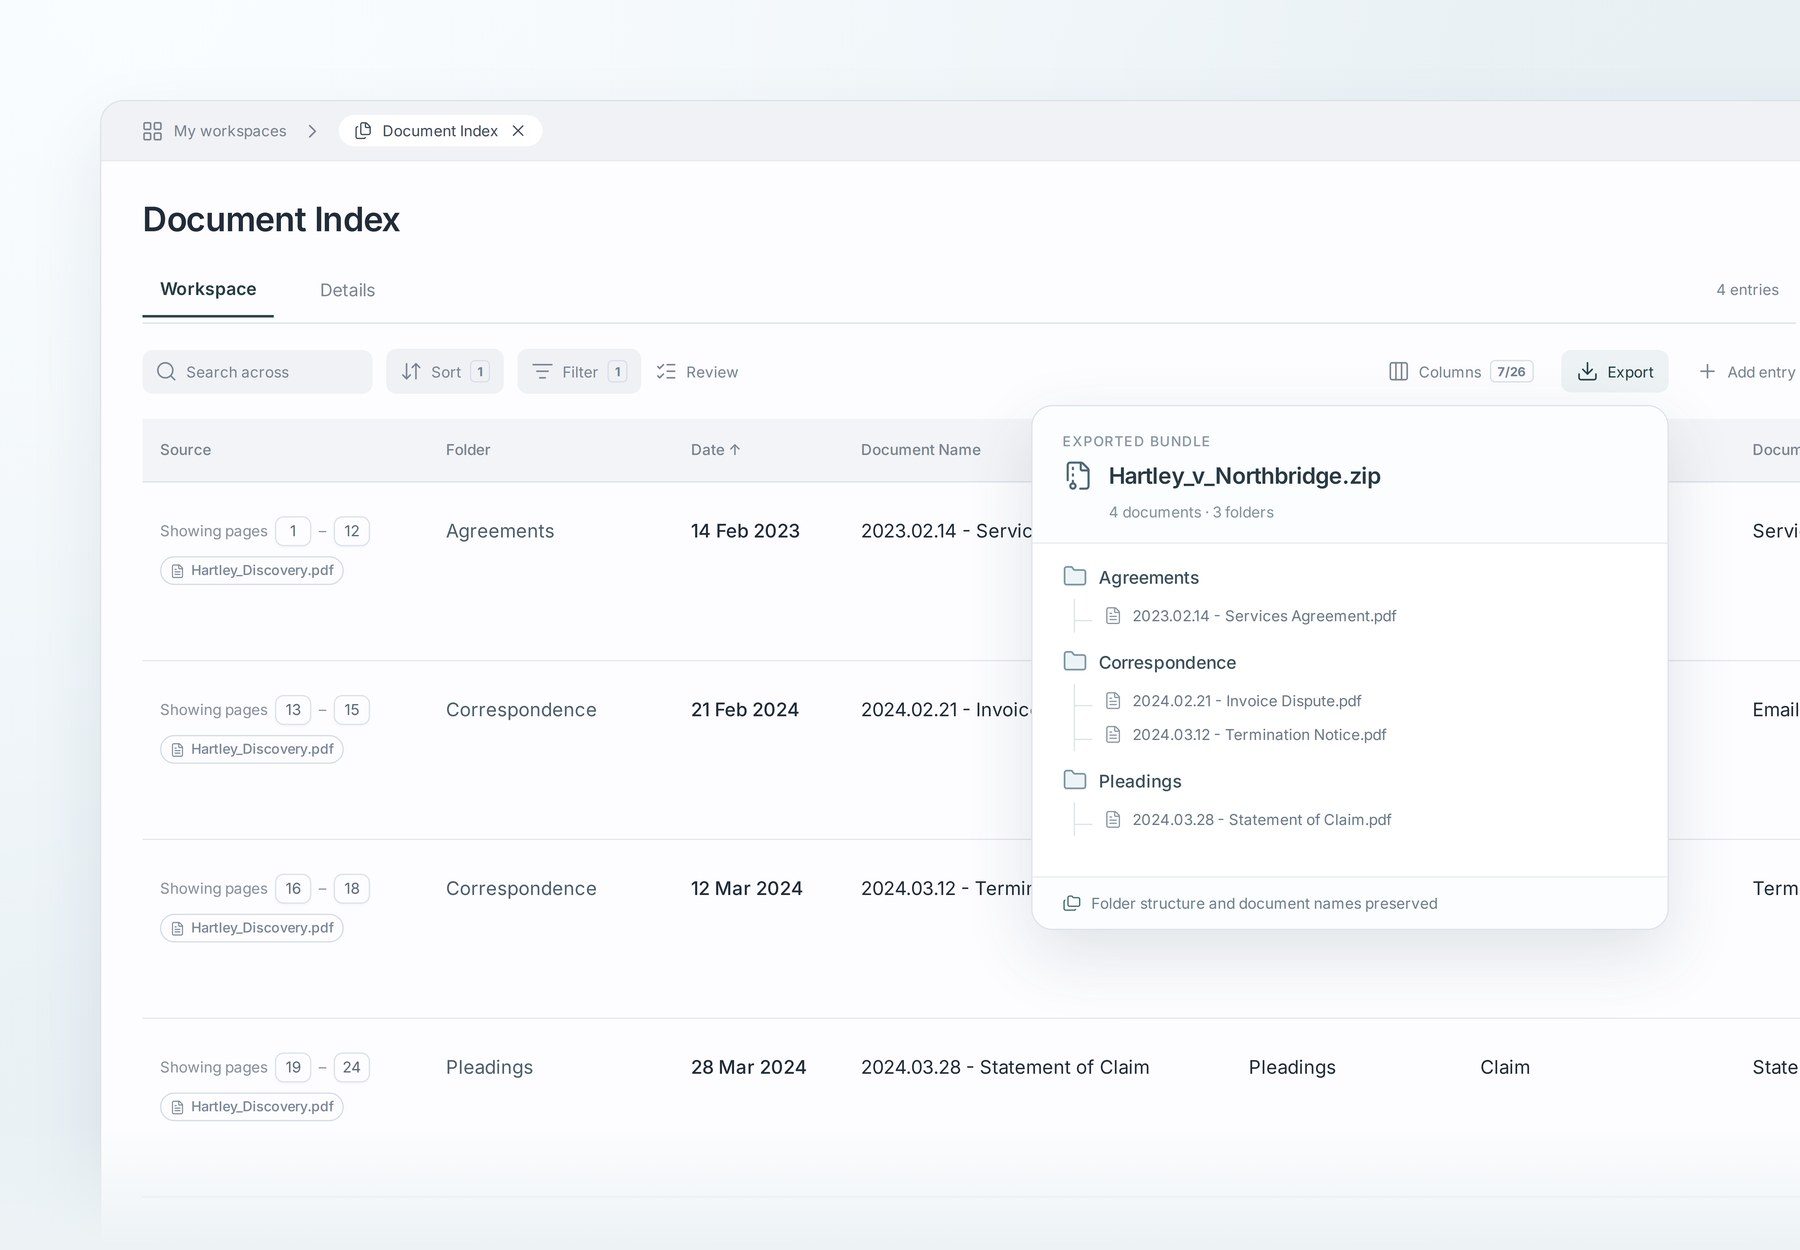
Check the index's identified documents against their original sources before creating or exporting work.
An original file, an index table and an exported set of sub-documents are different outputs. Keep that distinction clear when selecting what to share.
B5 · Find your way around a matter
Where | What you will find |
|---|---|
Mary tools | Start work with the available tools: Fact explorer for source questions, Create chronologies, Draft documents, and Analyse bank statements. Availability can depend on the matter and organization. This handbook calls source questioning Ask Mary. |
My workspaces | Completed work such as chronologies, drafts and analyses. Open the result to check, edit or export it using the controls for that output. Creator information helps identify the work. |
Chats in the sidebar | Existing conversations, including source questions. Open a conversation and choose Open in workspace on its result card to return to completed work. |
Document index | Identified, named and categorized documents with source references. |
Matter Summary | Background and matter context. Keep it accurate for the requests you make. |
A work product's Details | Information about that output, including source usage where supported. |
If work seems missing, first check the matter, active filters, My workspaces, Chats and your access. Do not recreate or regenerate it merely to investigate.
B6 · Create your first chronology
Open Mary tools → Create chronologies. Work through the request, clarification and plan before generating the chronology.
Request. Brief Mary as you would brief a colleague. Name the issues, parties and date range. Ask for verbatim extracts where exact wording matters. For example: “Build a chronology of events relating to the price changes under the supply agreement between January 2023 and June 2024, including verbatim extracts of key correspondence.”
Steer and plan. Answer the clarification questions about detail, columns, dates and parties. For example, you might ask for a column distinguishing primary and secondary sources. Check the proposed plan, its source scope and key issues before confirming it. Use any offered way to describe your own requirements.
Generate. Let Mary build the chronology. Larger matters can take longer. Return through Chats → Open in workspace or My workspaces when the work is complete.
For a broad first pass, you can request a master chronology: “Generate a chronology. It should be as broad as possible—extract all facts from all source documents.” Treat this as a requested scope, not proof that every relevant fact has been captured. Review source coverage in the next step.
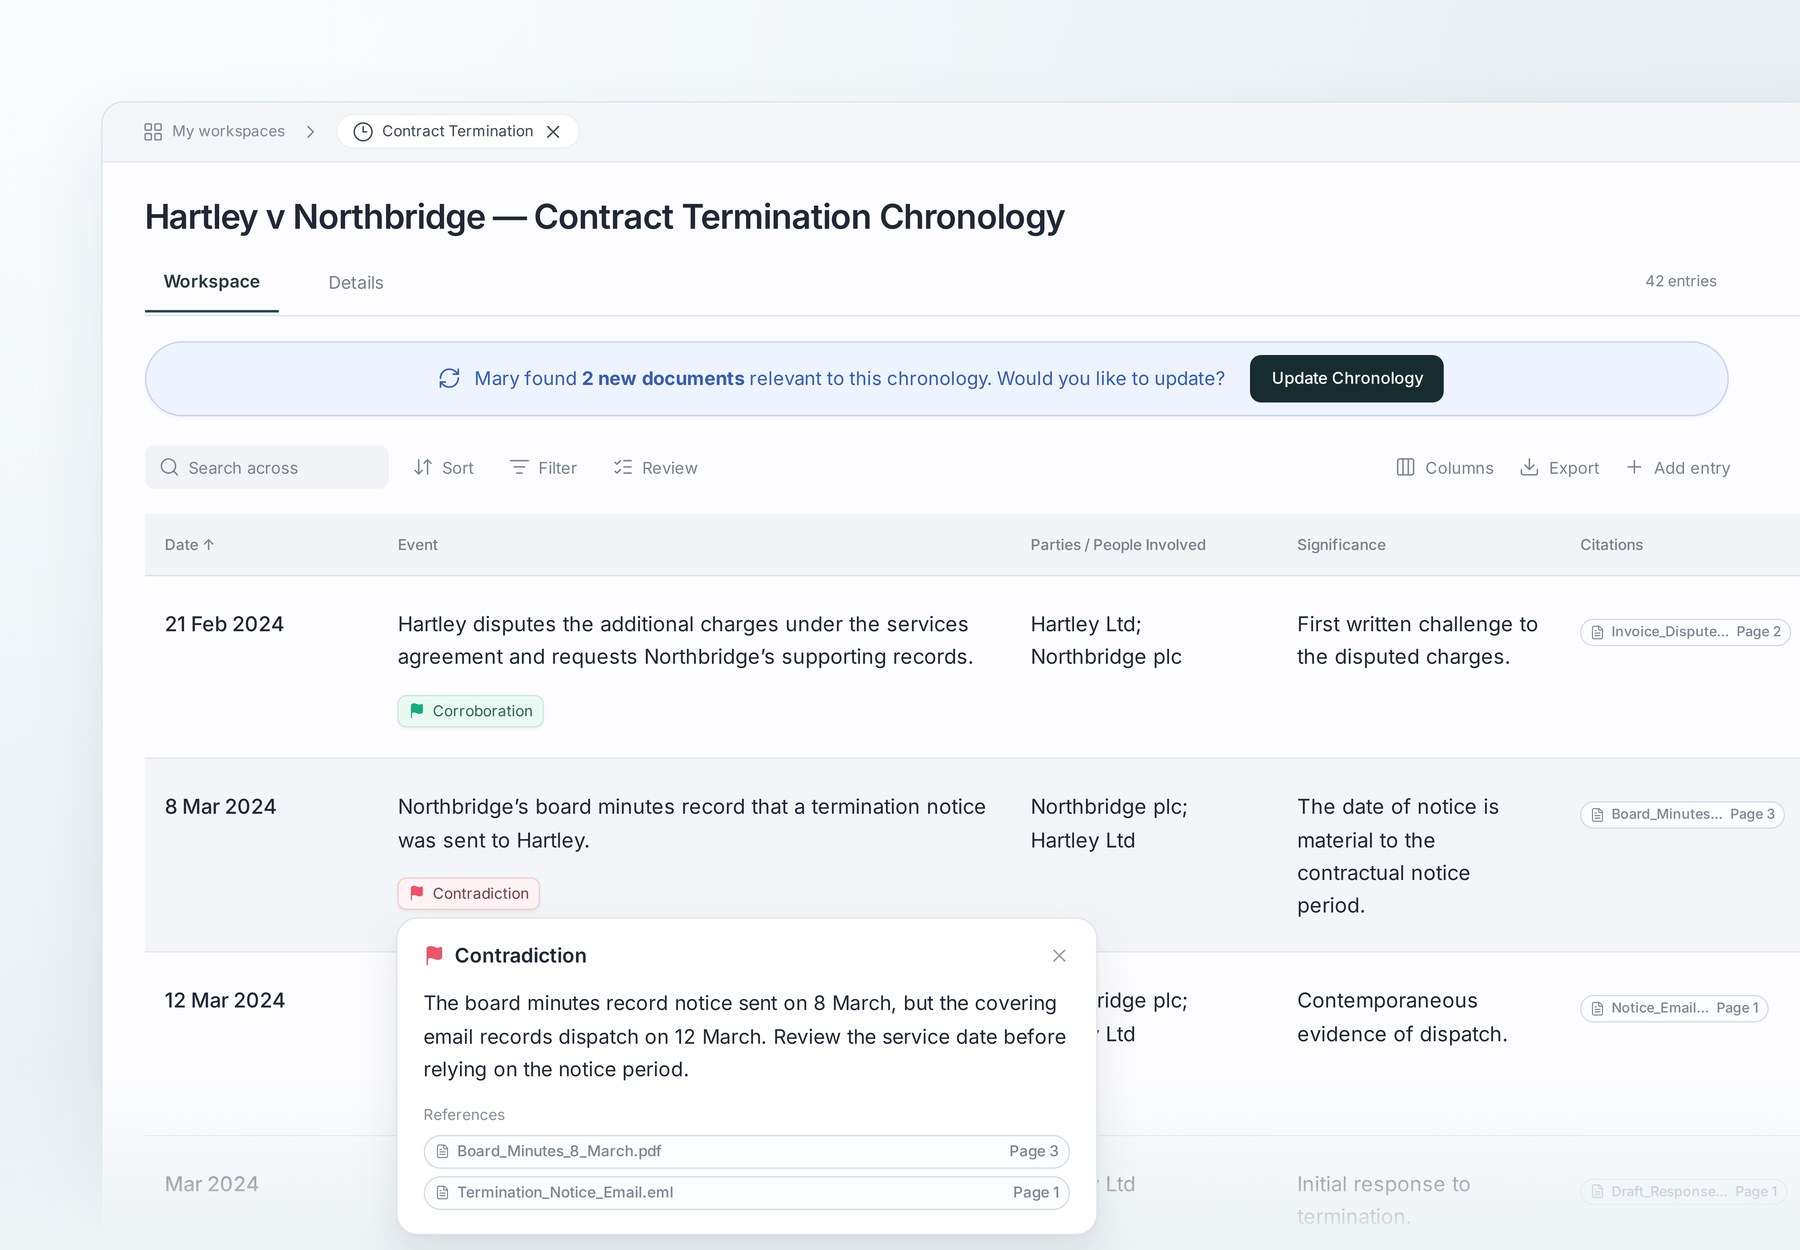
A completed chronology: check the dates, flags and supporting citations.
To correct ordinary editable text, click the relevant cell and make the change. It saves automatically and syncs with others working on the matter. Recheck affected wording and citations. If a verified row's data changes, it needs review again.
B7 · Review and verify
Mary does the extraction; your team keeps the judgment. The Review workflow applies to relevant factual work products, including chronologies, analyses and financial results. A drafted document is checked through its text and citations, not this row-review workflow.
Open the chronology's Details and check its summary and source coverage. Review Used and Not used sources where shown. If a relevant document was not used, inspect the reason and reconsider the request or plan; do not assume there is a universal force-include control.
Open an entry's citation and read the cited source and surrounding context.
Select Review, choose the review statuses and/or flags you want to work through, then select Start review. Use available source filters to focus the set.
Check each entry and record Verified or Needs review as appropriate. Unverified entries still need checking. A verification decision records review; it is not a guarantee of correctness.
Work through relevant flags and add a note where a colleague needs to understand the issue. Notes are not a substitute for separately agreed review responsibilities.
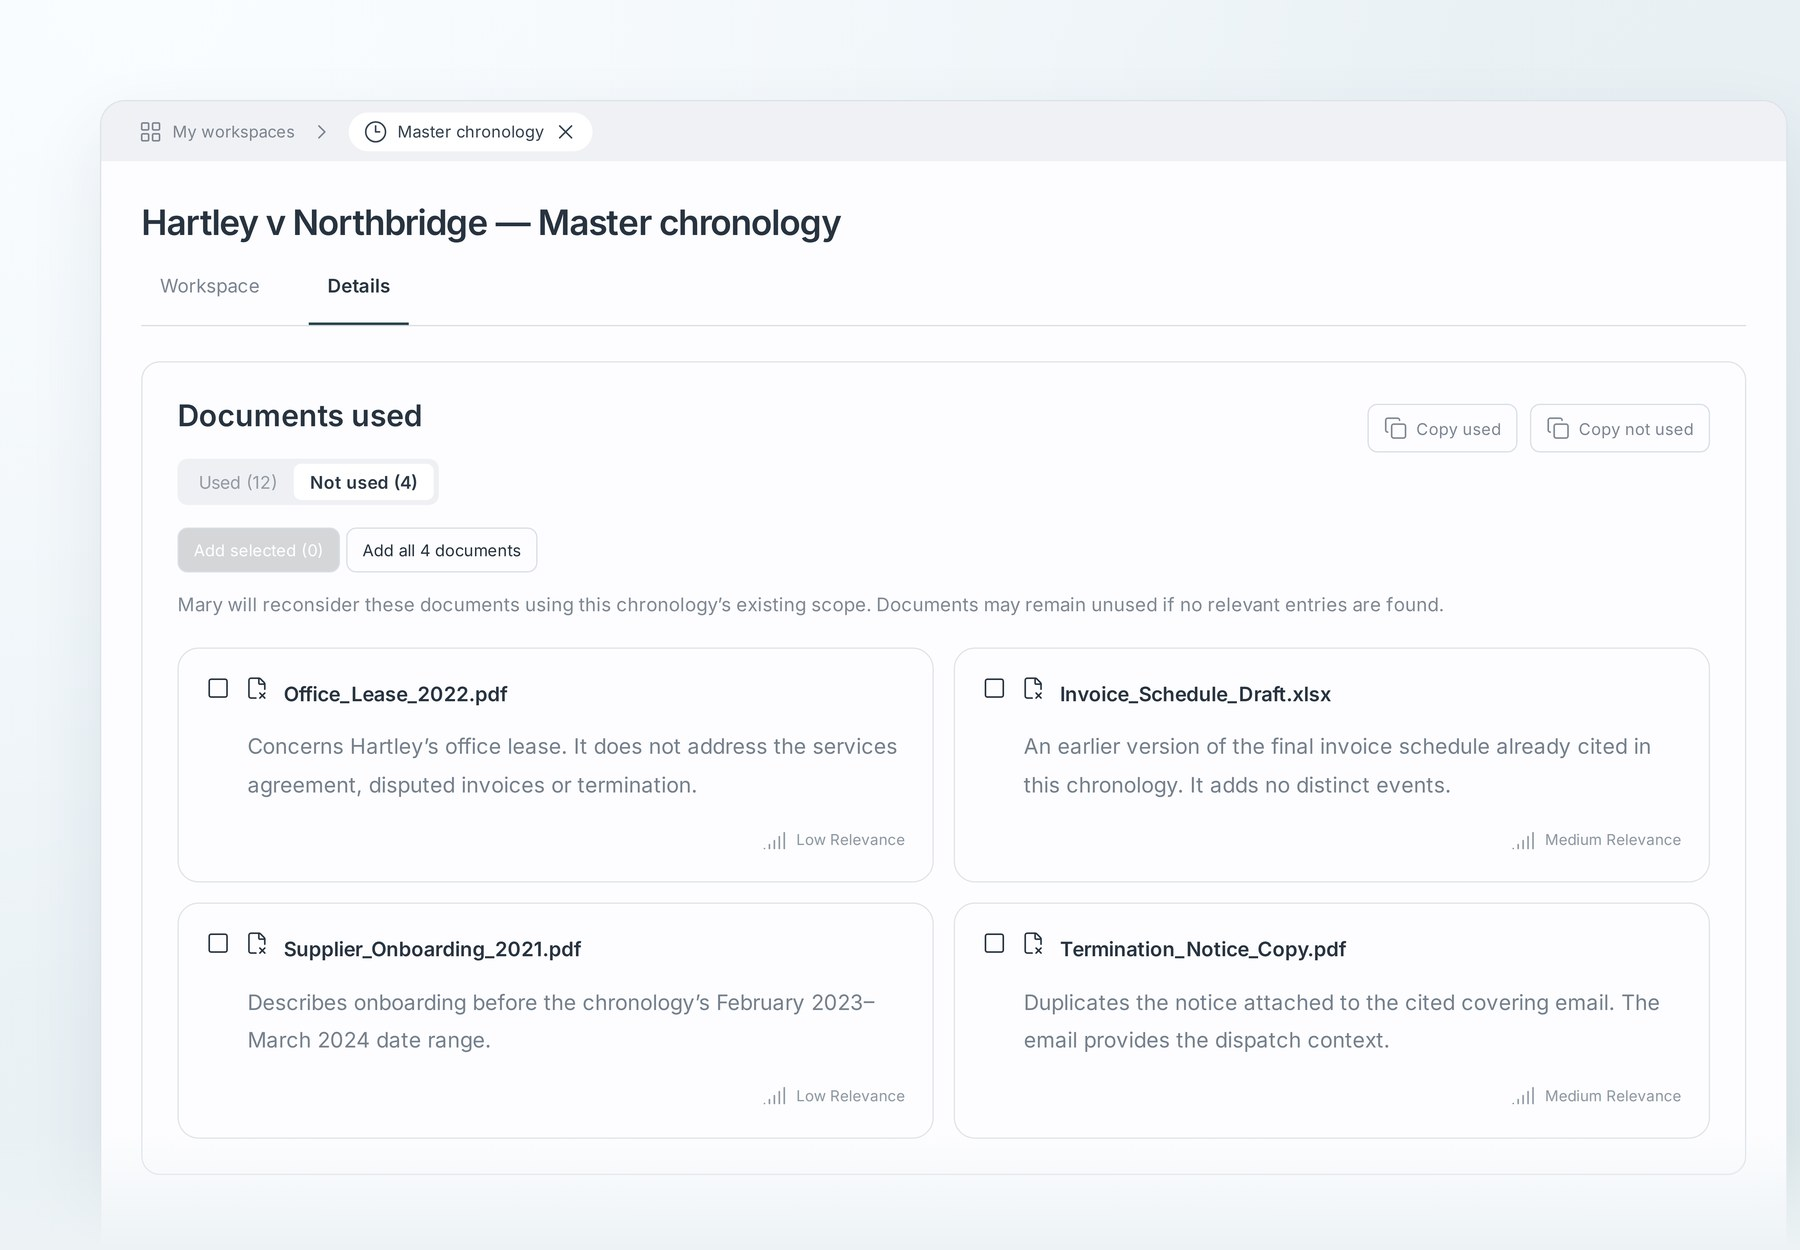
Review unused sources and their explanations to identify possible gaps in coverage.
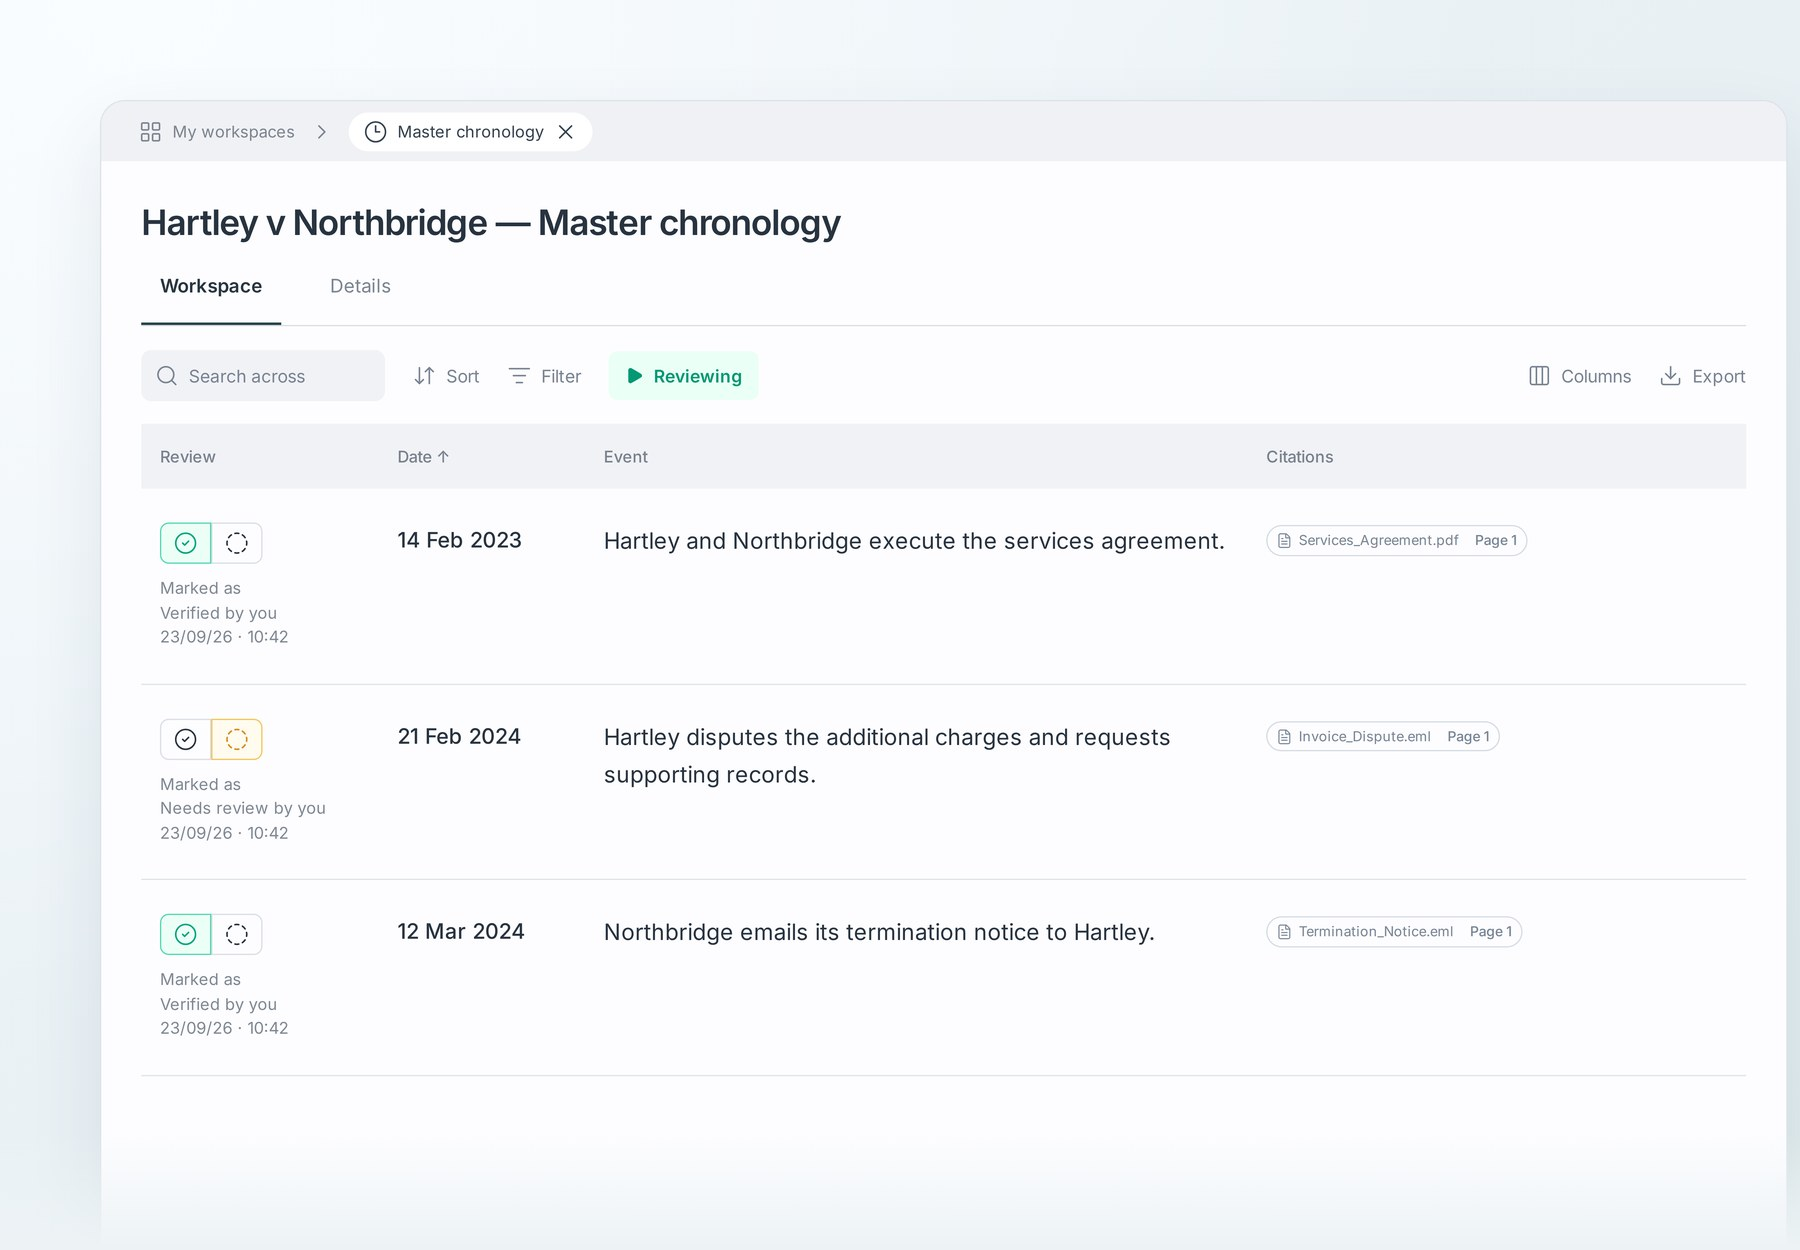
Review entries against their citations, then record the appropriate review decision.
Prioritize contradictions, corroboration, allegations, gaps, inferred dates, low-quality sources and possible privilege where those flags are available. A flag identifies something to examine; it does not decide the legal issue.
Supported entries have history showing who changed what and when. Inspect the differences before using a restore control. Row history is distinct from recovery of a deleted matter or work product. Recheck an entry after changing its data.
B8 · Go further: questions, drafts and export
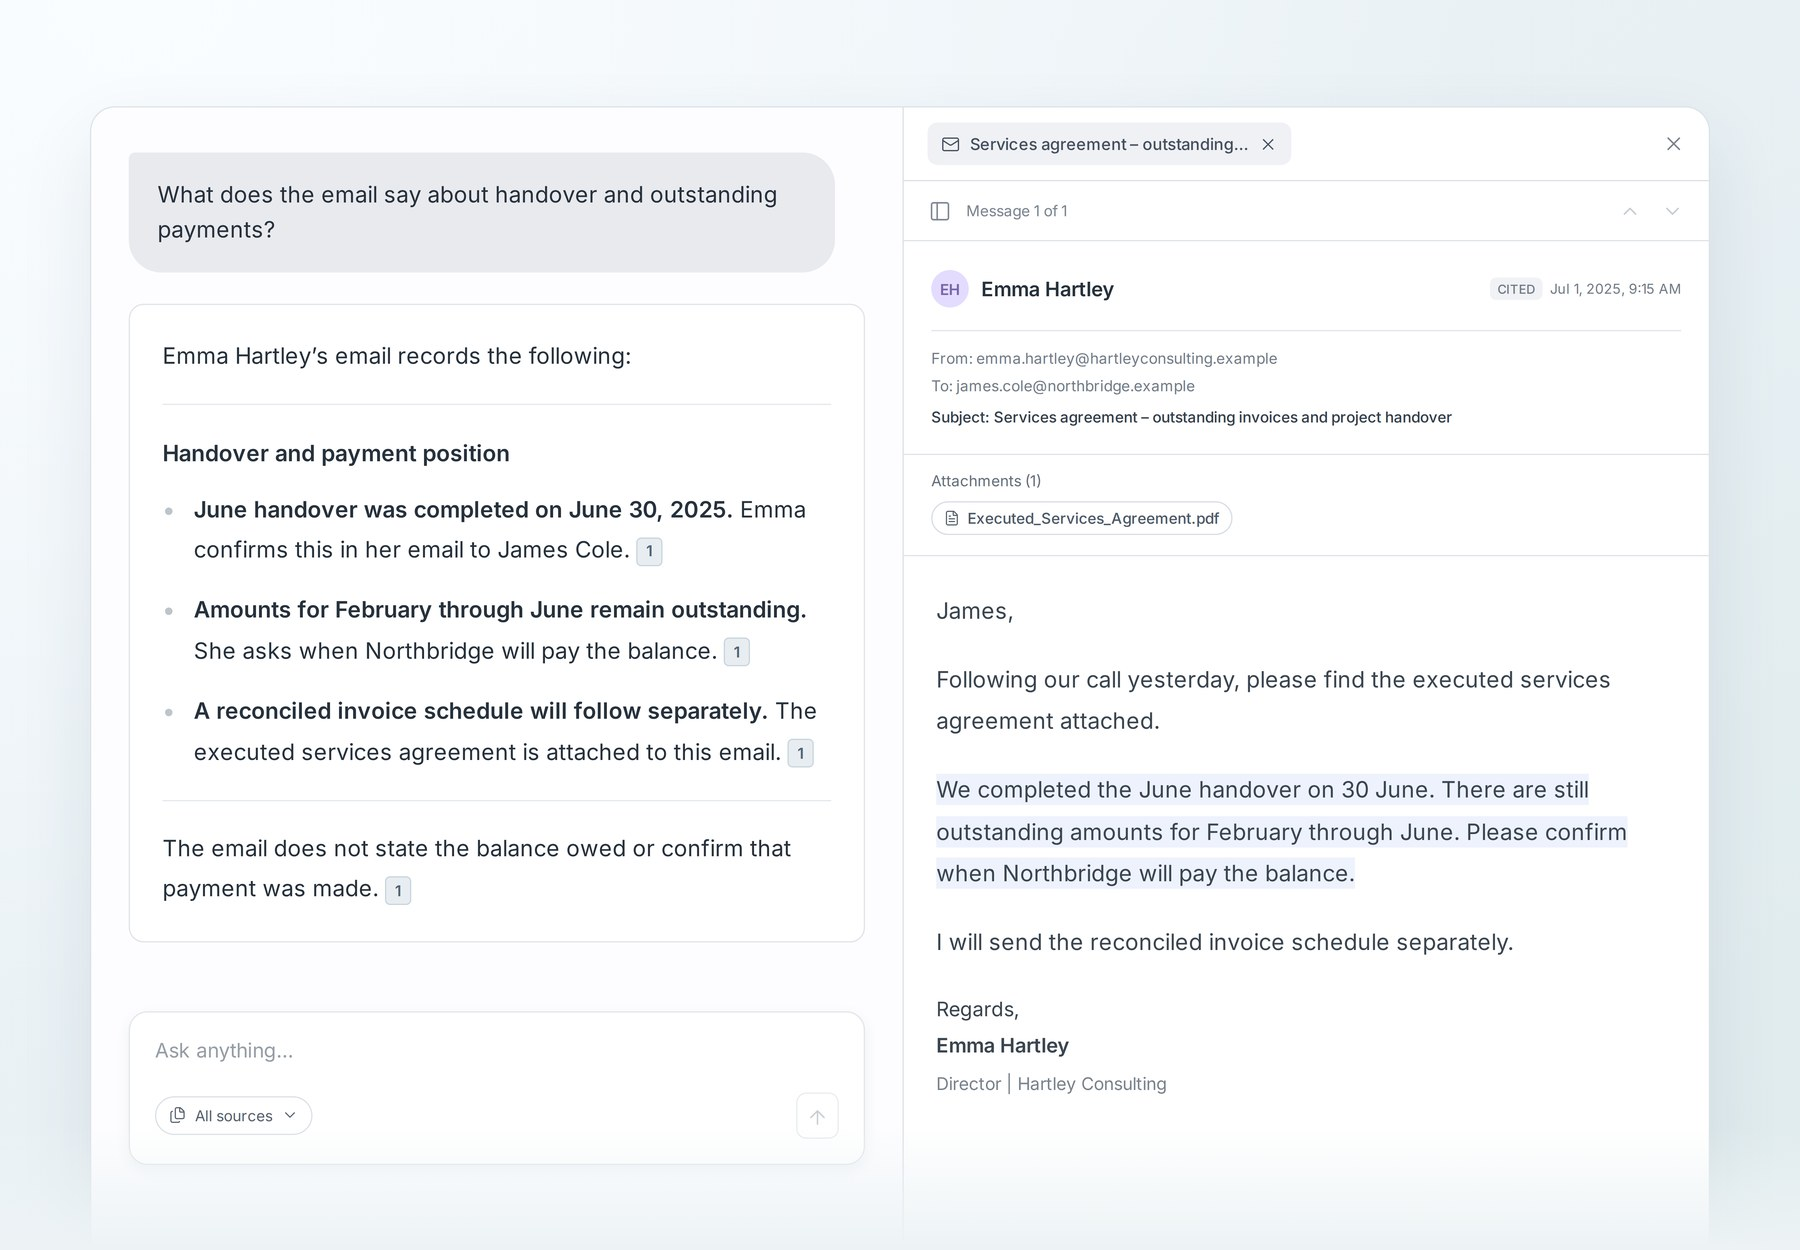
Open an answer's citation to check the source beside the answer.
Use | When | Example |
|---|---|---|
Ask Mary through Fact explorer | A focused question across documents or initial exploration | “When did the witness discuss the variation, and what exactly did he say?” |
Create chronologies | A structured record of events, scoped to an issue, party or period | Use the price-change example in B6. |
Draft documents | Longer written work grounded in the matter's evidence: memos, evidence outlines, comparisons or examination questions | “Prepare an outline of cross-examination questions for the CFO on the pricing issue, with supporting citations.” Check the available context and plan. |
Analyse bank statements | A transaction table, counts and totals from processed PDF statements | “Show the payments John received from Apple Inc from July 1, 2025 to June 30, 2026, and total the included transactions.” Check the person, accounts, direction and period. |
Export | Sharing a checked result in a file | Choose the format offered for the output. Chronology/table options differ from a draft's Word download. |
The tools serve different tasks. Use questions for a focused answer and a chronology for a structured timeline. Find completed work in My workspaces or reopen its result through Chats.
For drafts, choose whether to Include citations before Download .docx. For tables, check active search and column filters before exporting; these affect supported exports. Review the downloaded file's content, formatting and references. An exported link does not grant a recipient access to the underlying Mary matter.
Tips for getting the most from Mary
Start with a real, approved problem on a matter rather than testing every capability at once.
Scope requests tightly. An issue-by-issue approach is often easier to review than “all facts about everything” on a very large matter.
Use Mary for everyday fact questions as well as final work products.
If something is missing, check processing, selected sources, issues and parties in the plan before refining the request. Check the new result again.
Arrange a short session with Mary before a large or complex matter if you need help planning the workflow.
Part C · Key capabilities
Mary supports the fact workflow from receiving documents through preparing and checking work. These sections explain the capabilities introduced in Part B and when to use them. Availability depends on your firm's setup and the relevant tool.
Section | Capability | Use it to |
|---|---|---|
Bring the whole matter in | Add supported folders, ZIP archives, emails and spreadsheets while retaining source context. | |
Integrations | Work with supported systems your firm already uses. | |
Organize and index | Turn source bundles into an index of identified documents. | |
Matter context | Explain the parties, issues and background relevant to the work. | |
Chronologies | Build a broad or focused structured timeline. | |
Draft documents | Prepare evidence-based first drafts using a prompt or template. | |
Ask questions | Check a point, explore an issue or find what a witness said. | |
Financial analysis | Review transactions, counts and totals from PDF bank statements. | |
Verify and identify risks | Check citations, flags, source coverage and supported entry history. | |
Collaboration | Work with colleagues on a shared matter. | |
MCP connections | Use available Mary tools through a supported AI application's directory connection. |
C1 · Bring the whole matter in
Add supported files in the form you received them, including folders, ZIP archives, emails and spreadsheets. You do not need to extract a supported ZIP first. Preserve the source set's context and check the result after upload.
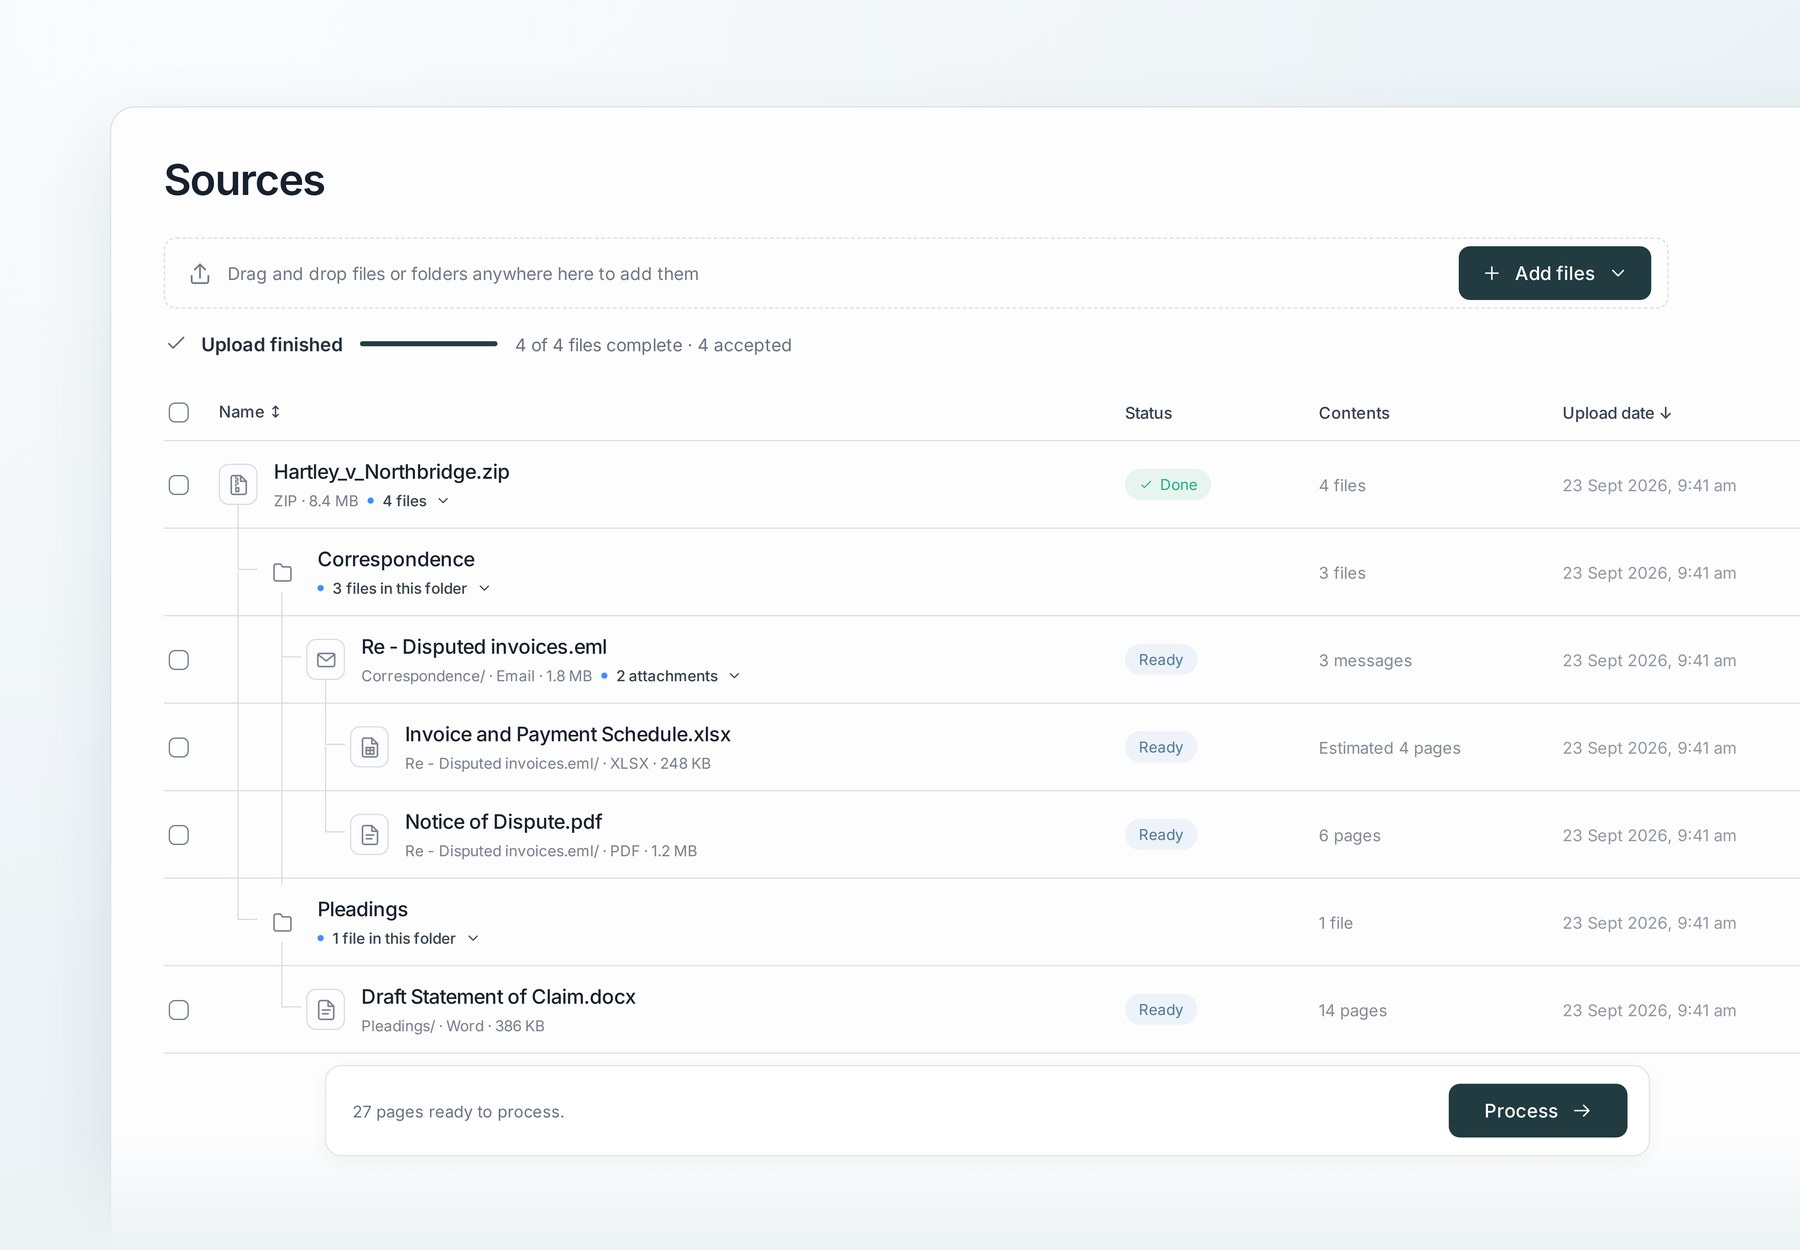
The source hierarchy keeps folder and attachment relationships visible.
Type | Supported formats |
|---|---|
Documents | PDF, DOC, DOCX |
Spreadsheets | XLS, XLSX |
Emails | EML, MSG |
Archives | ZIP |
Images | PNG, JPEG, BMP, WebP |
Folders and ZIP archives. Add whole folders or ZIP archives, including nested folders. Mary retains supported original folder paths and archive structure, identifies the files inside and processes them by type. Generated document names in the index serve a different purpose from the original source path.
Emails and attachments. Keep emails in EML or MSG format to preserve supported thread and attachment relationships. In the native experience for new matters, you can inspect those relationships while checking the source. Older matters use the PDF-based viewer.
Spreadsheets. Add XLS or XLSX alongside the other documents. Spreadsheets have no fixed page count, so Mary uses approximate page equivalents. Do not treat one tab or one printed sheet as a billing formula. Check the displayed estimate and ask support for an explanation if needed.
Cloud import. Where enabled, choose Google Drive or OneDrive from + Add files, authorize if prompted, select files, review them and choose Process. C2 covers other provider connections.
To upload:
Open the matter and select + Add files.
Add local files/folders or select an enabled provider.
Review the detected files.
Resolve applicable Needs attention items.
Select Process, or Finish & Generate during matter creation, then check processing status.
Credits are deducted only after pages fully process. You can return to the matter to check progress; leaving the page is not proof that every file completed.
Limit | Maximum or guidance |
|---|---|
Files per upload batch | 5,000 |
Pages per processing batch | 50,000 |
Pages per file | 10,000 |
PDF, Word and spreadsheet files | 500 MB each |
Email and image files | Check the current type-specific limit shown for the upload and the supported-formats guide. |
ZIP archives | 2 GB each |
Files awaiting upload at one time | 5 GB; this is not a total matter-storage allowance. |
For larger sets, use processing batches within the 50,000-page limit. See supported upload formats and limits for the maintained upload guide.
Before processing, the upload controls let you pause, resume or cancel an upload, retry a failed file, remove and re-add a pending file, rename it, or delete it from the pending upload. If the connection drops or you refresh, Mary attempts to resume the upload. Check actual progress before retrying or adding duplicates.
Mary checks the actual file format, not just its extension. An unsupported, damaged, oversized or duplicate file can appear with a reason in Needs attention. Duplicate detection considers both filename and folder location; this does not define billing for reprocessing.
The newer formats and limits apply to older as well as new matters. Native viewing applies to newly created matters. Adding a new Word file to an older matter does not switch that matter to the native viewer.
C2 · Integrations
Bring selected documents from the supported systems your firm uses, and use export-back only where the provider and output support it. Check the setup, export and sync options supported for your provider.
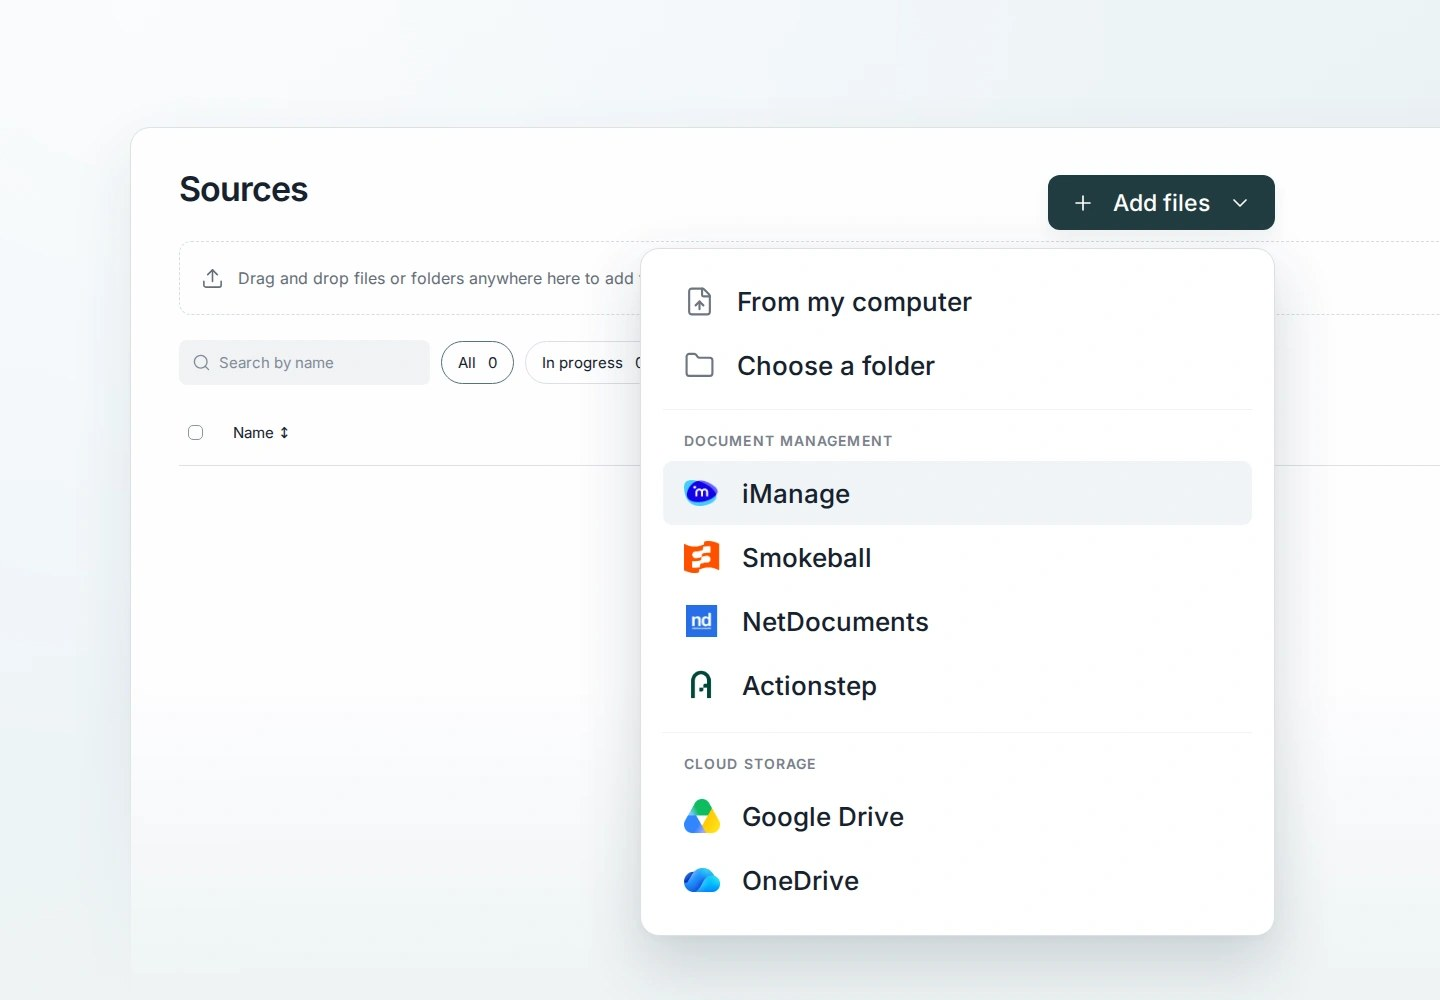
Choose an available source from + Add files. Connections depend on your organization's setup.
Connection | Category | Use and scope |
|---|---|---|
iManage Work | Document management | Browse/search workspaces and import selected material; supported output export-back is a separate choice. |
NetDocuments | Document management | Import selected matter documents. Check currently available export options separately. |
Actionstep | Practice management | Import matter documents; do not assume native data panels or later provider edits automatically become updated Mary sources. |
Smokeball | Practice management | Bring selected matter documents into Mary; check supported export destinations separately. |
Google Drive | Cloud storage | Select supported files for import through the available connection. |
Microsoft OneDrive | Cloud storage | Select supported files for import through the available connection. |
Claude and ChatGPT | AI assistants through MCP | Use available Mary matters and tools from the connected assistant. ChatGPT availability is US only. |
Harvey | Planned connection | Coming soon. Confirm availability with Mary before planning to use it. |
See A8 for setup. Treat import as selected material brought into Mary; do not assume later changes in the provider automatically refresh your Mary work. If expected files are missing, check the intended provider account, source location, permissions and firm enablement with your administrator or support.
C3 · Organize and index the documents
Mary identifies documents within the uploaded material and builds an index you can search and check.
Check generated names, descriptions and source references in the Document index.
Split, name, summarize and categorize. A source bundle can contain several identified documents. Check each index entry's page range against the original bundle.
Use firm conventions where enabled. Agree optional naming and organization requirements with Mary, then select the enabled convention at matter creation (A7). Otherwise use the standard index.
Prepare documents for sharing. Use the export offered for the index or sub-documents. Check the resulting names, folders, order and pagination. An index export is different from downloading an original source.
Review supported editable fields before exporting. Changing an index label does not by itself prove that earlier findings or exported copies have changed.
C4 · Guide Mary with matter context
Give Mary a useful account of the matter's background, who the firm acts for, the key parties and the issues. Check the matter Summary, relevant key documents and Additional context during setup.
Accurate context helps explain what you mean by a general request. Make the specific request and proposed plan accurate too: name the dates, parties, documents and output you need rather than assuming background alone settles the scope.
Update supported context fields when needed, but check affected saved work separately. After changing matter context, check each existing chronology, draft or answer that needs to reflect the change.
C5 · Build chronologies
Use Mary tools → Create chronologies for the timeline the task needs: fact-level or document-level, broad or focused on particular issues, parties, sources or dates.
A chronology provides a structured record whose entries can be checked against the cited sources.
Brief it like a colleague. Describe the task in plain language, answer clarification questions and check the proposed plan.
Shape the output. Ask for useful columns, an appropriate level of detail and the wording or extracts you need.
Check reliability. Review the summary, source coverage and flags such as contradictions, corroboration, gaps and inferred dates.
Review proposed updates. Relevant new documents can trigger updates for supported chronologies. Review and apply the proposed changes, then check the updated entries. Do not assume one updated output refreshes every other piece of work.
Edit ordinary cells directly. Changes save automatically and sync. Recheck citations and any changed verified entries.
Share a checked export. Choose the available Word or spreadsheet/table export and check the resulting file. Do not assume every format preserves all flags, formatting or citation behavior identically.
Return to B6 for the complete first-chronology sequence.
C6 · Draft documents
Use Mary tools → Draft documents to prepare a first draft grounded in the matter's evidence: a memo, brief, evidence analysis, comparison or examination outline.
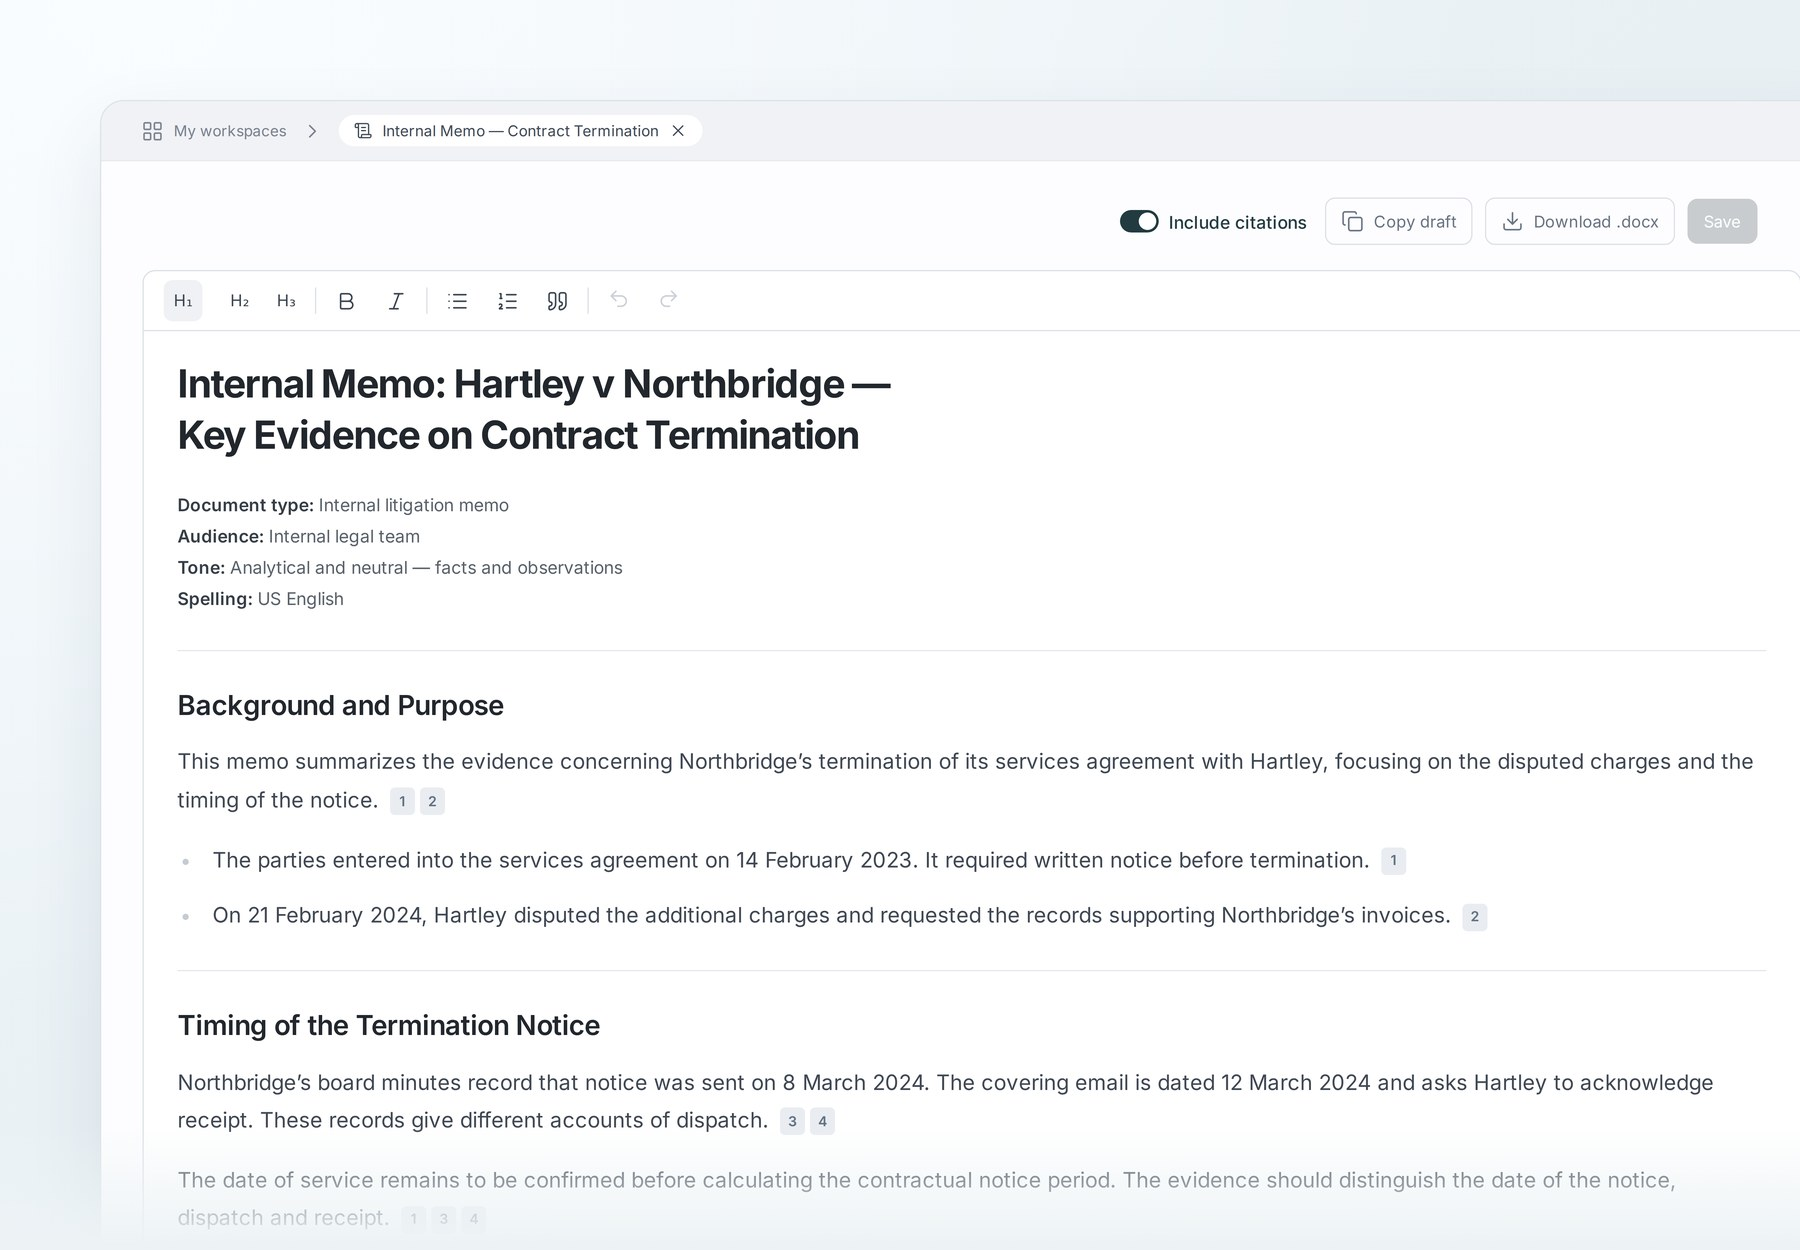
Check the draft's wording and inline citations before downloading it.
Choose an existing template or Draft without a template.
Describe the purpose, required content and important files or dates.
Answer clarification questions and review the proposed plan before proceeding.
Open the completed Draft document result with Open in workspace.
Edit the draft directly. Ordinary text changes save automatically and sync; you do not need a separate Save workflow for those edits.
Open supporting citations and recheck any affected by your changes. Use the available citation controls carefully; removing a citation does not verify the remaining text.
Choose whether to Include citations, then Download .docx. If you use the copy control, check the copied text and links in the destination.
Organization admins can upload firm drafting templates. Agree the template and its requirements before relying on a generated document to match a precedent. Review headings, content, tables, formatting and references in the downloaded Word file.
Draft checking is separate from row verification. Do not look for chronology-style Review statuses as the way to approve a drafted document.
C7 · Ask questions of the evidence
Use Ask Mary for a natural-language question about your documents. In the illustrated interface, the tool is labeled Fact explorer under Mary tools.
Ask across the matter or describe the specific documents and scope you need. It is useful for checking a point, testing a theory or finding what a witness said and when. For example: “When did the witness discuss the variation, and what exactly did he say?”
Read the cited email and its surrounding context alongside the answer.
Open the citations, check the scope and read any qualifications before relying on the answer. Return to existing questions through Chats. When continuing a conversation, make clear which documents you mean and check the sources in the new answer.
C8 · Analyze financial records
Use Mary tools → Analyse bank statements for transaction tables from processed PDF statements. The dedicated workflow can identify transactions across statements and produce question-specific tables, counts and totals with source-page citations.
Describe the financial question.
Check the proposed scope: people or accounts, transaction types, direction and dates.
Confirm the plan and review the resulting table and included transactions.
Open cited statement pages to check date, amount, account and description.
For example: “Show the payments John received from Apple Inc from July 1, 2025 to June 30, 2026, and total the included transactions.” Specific dates make the requested period clearer than “the last 12 months”.
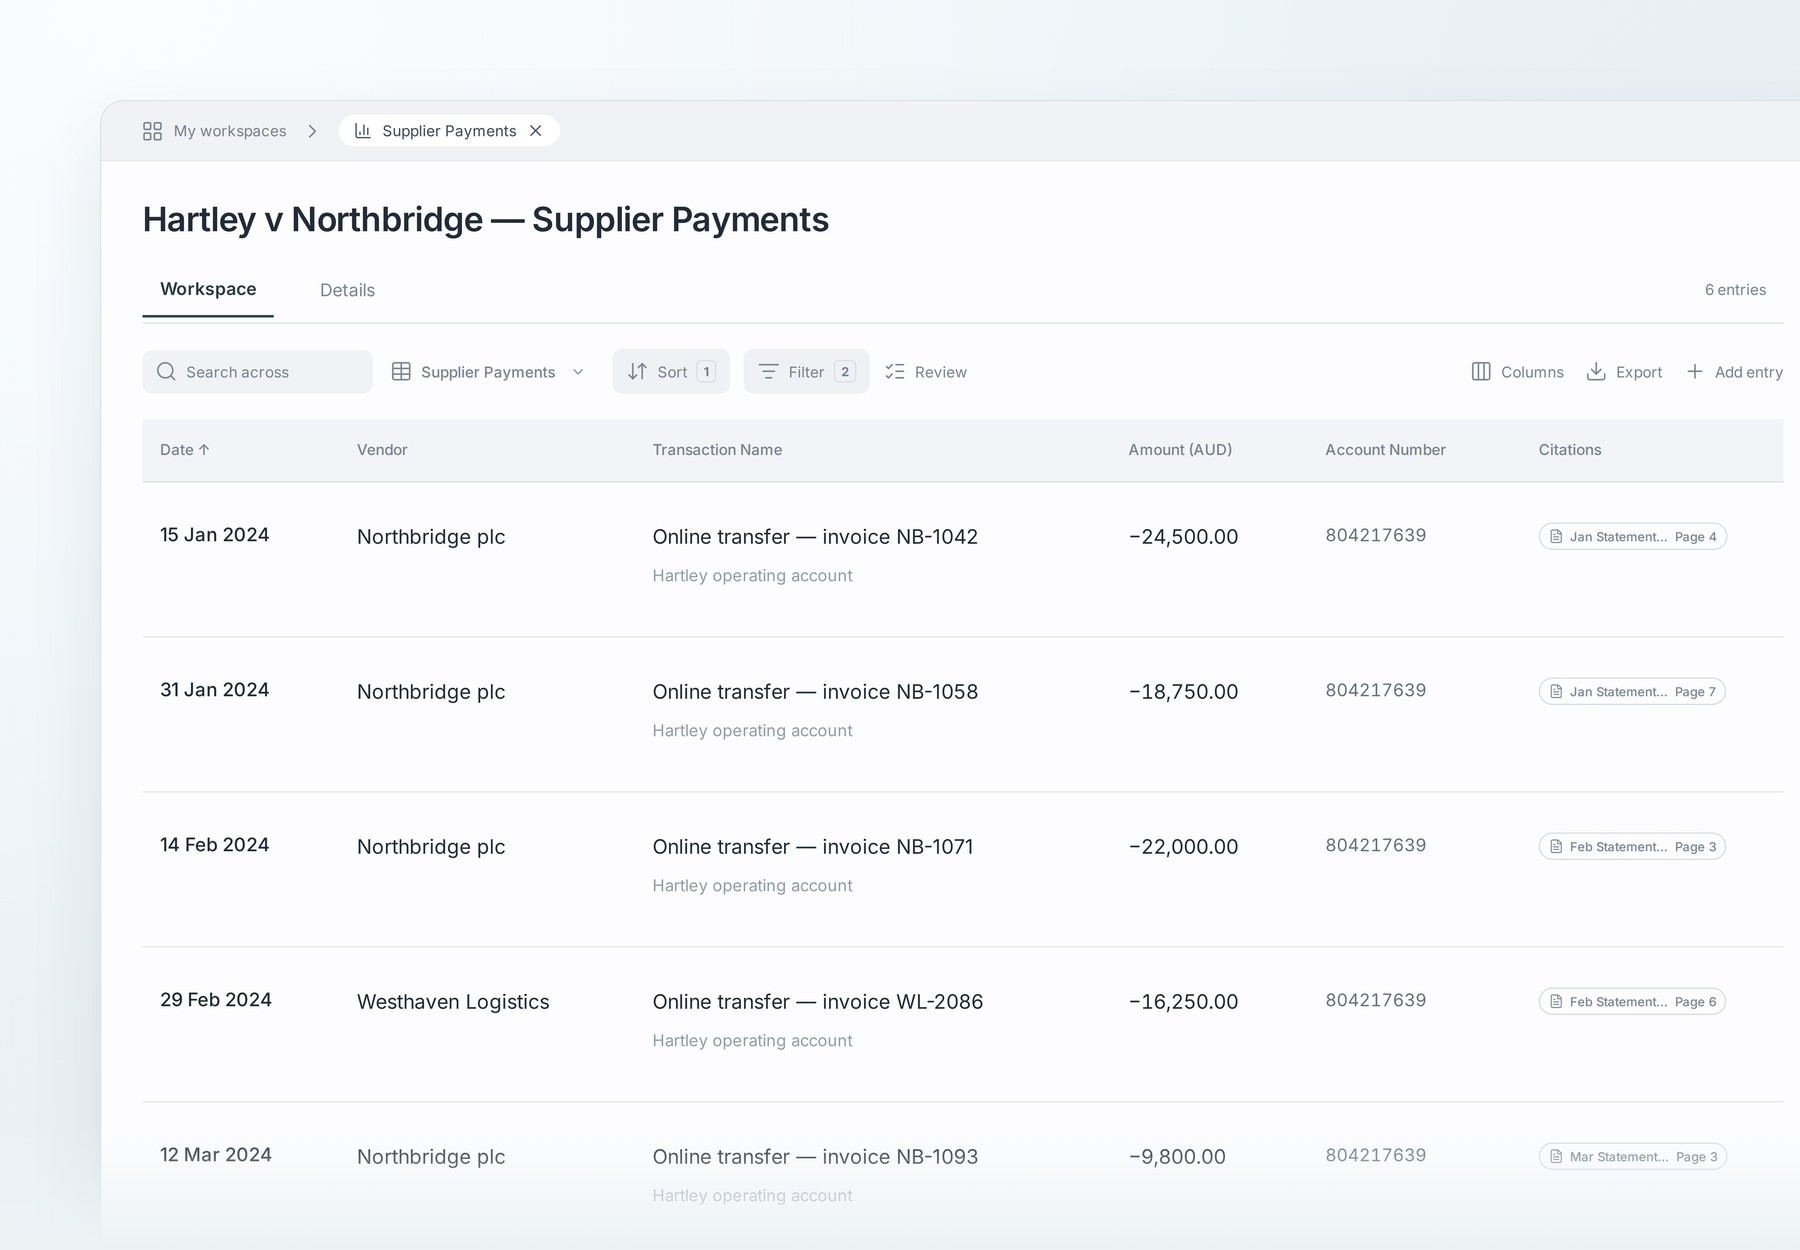
A transaction table links included payments to their statement pages.
Check source coverage and processing first. Scans or statement-recognition problems can omit information. Review overlapping statements, duplicate handling, refunds, reversals and debit/credit direction before relying on totals. The result's count and total describe the transactions included in its scope.
Bank-statement analysis does not automatically reconcile the table to a statement's printed closing balance. Do not infer missing assets or wrongdoing from a transfer classification alone. Availability of transfer tracing can vary.
Other processed financial documents can inform separate questions and chronologies. Use PDF statements for the dedicated bank-statement workflow; uploading a spreadsheet does not make it a bank-statement input.
C9 · Built to verify and identify risks
Mary provides evidence and review controls so your team can check the work. Read the original source and its context; neither a citation nor a review badge is a guarantee of correctness or completeness.
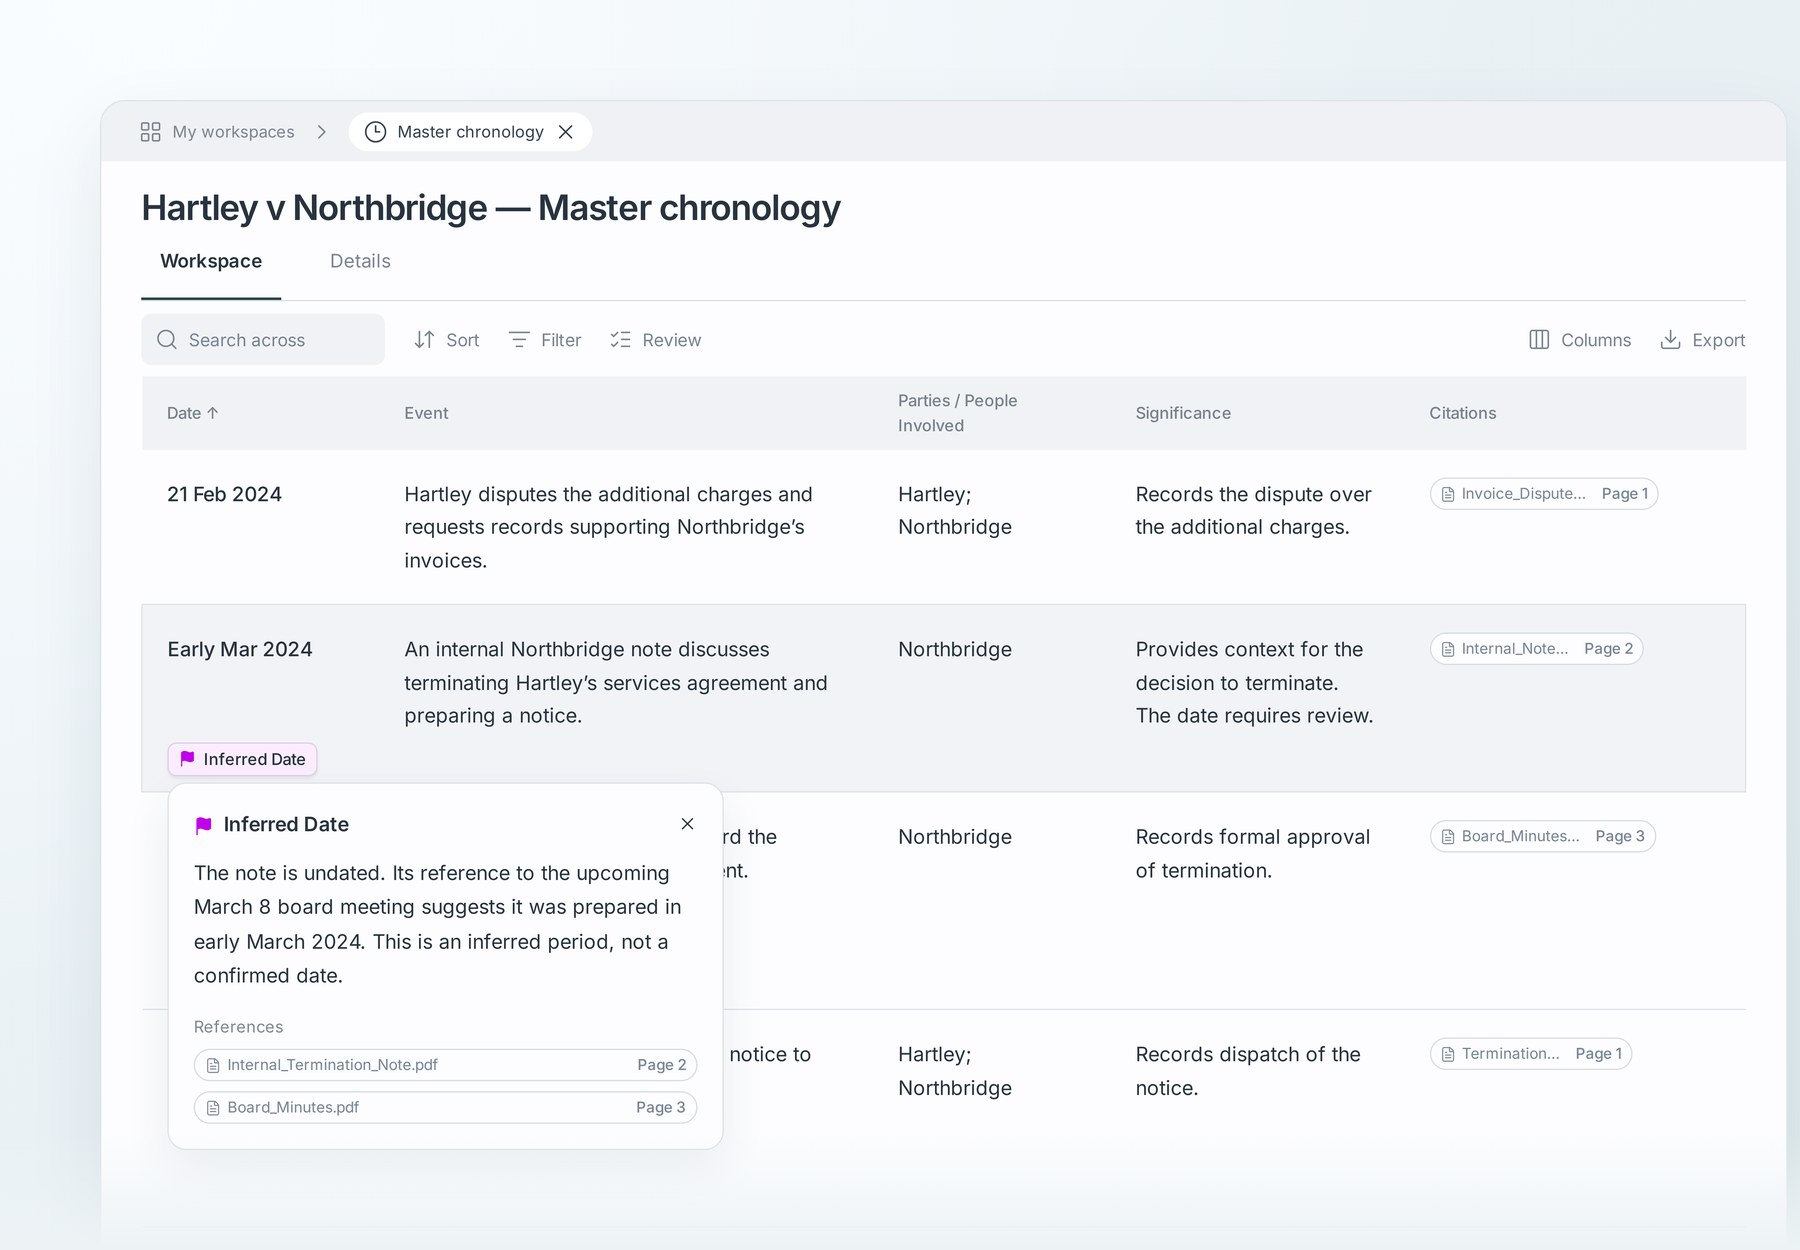
Read the explanation behind an inferred date and check the cited pages.
Capability | How to use it |
|---|---|
Citations | Open the source page or location beside the finding and read the surrounding context. Check each source when there is more than one. |
Native source viewing | Newly created matters can display supported spreadsheets, email threads and attachments, and Word documents with supported tracked changes and comments. Older matters continue to use the PDF-based viewer. |
Flags | Examine contradictions, corroboration, gaps, allegations, inferred dates, low-quality sources and possible privilege where offered. Available flags vary; they are prompts for review, not legal determinations. |
Used and Not used sources | In supported work such as chronologies, inspect source relevance and reasons for inclusion or exclusion to identify potential gaps. |
Review states | For relevant factual entries, record Verified or Needs review after checking. Unverified entries still need review. Changed verified row data needs checking again. |
History and notes | Inspect supported entry history, differences, actor and time. Leave useful notes; check the consequences before restoring a version. For missing or deleted work, contact Mary support. |
Search, filters and editing | Focus work using the available date, source, review-status, flag or custom-column controls. Edit supported ordinary cells directly; changes save and sync automatically. Special source-reference or structural operations can have different controls. |
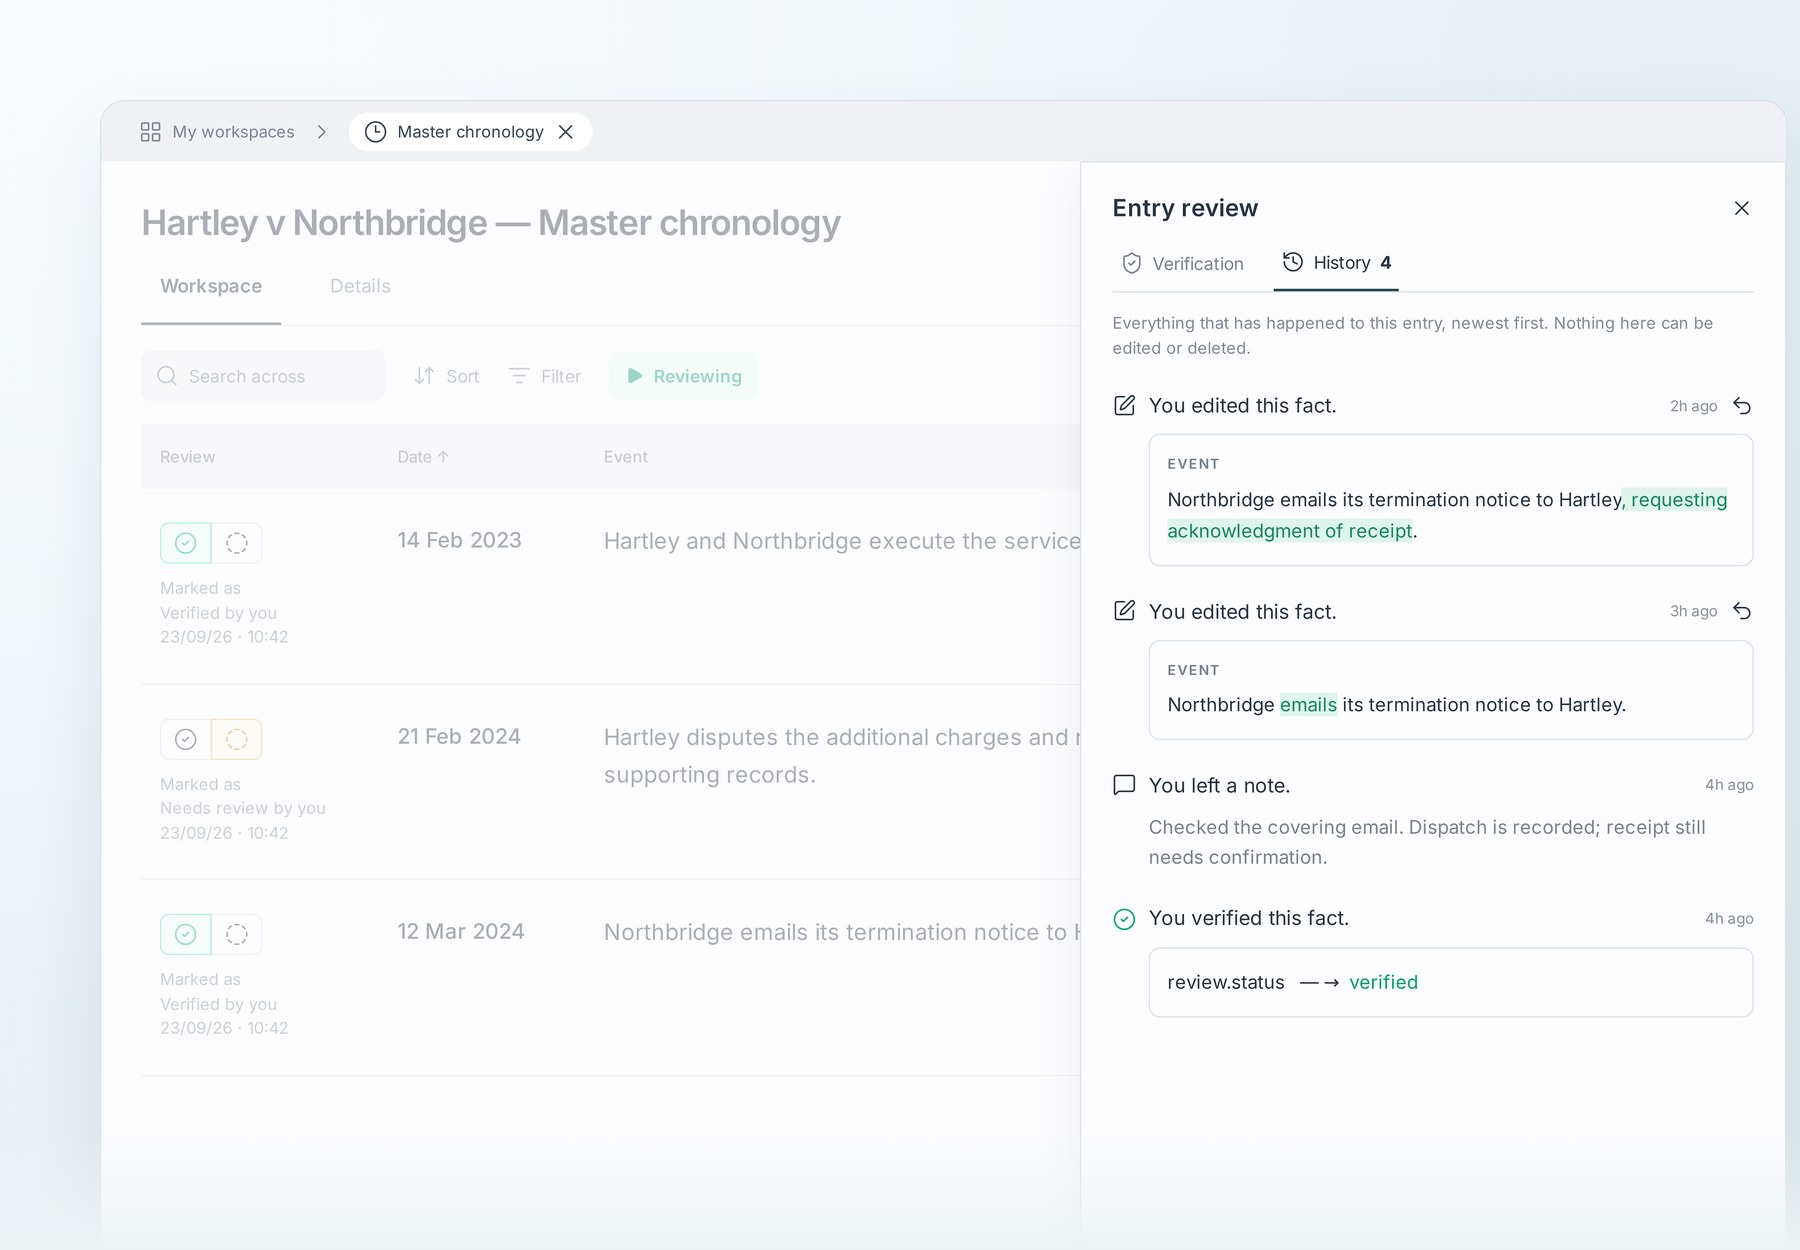
Use a supported entry's history to inspect changes before deciding whether to restore a version.
For a drafted document, check text, sources and the exported result separately. The factual-entry Review workflow does not apply to drafting.
C10 · Collaboration
Share a matter with the colleagues who need to work on it. Colleagues invited to the matter can see its work products. Confirm the intended recipient and the access offered by the current sharing control. Organization membership alone does not explain every person's matter visibility.
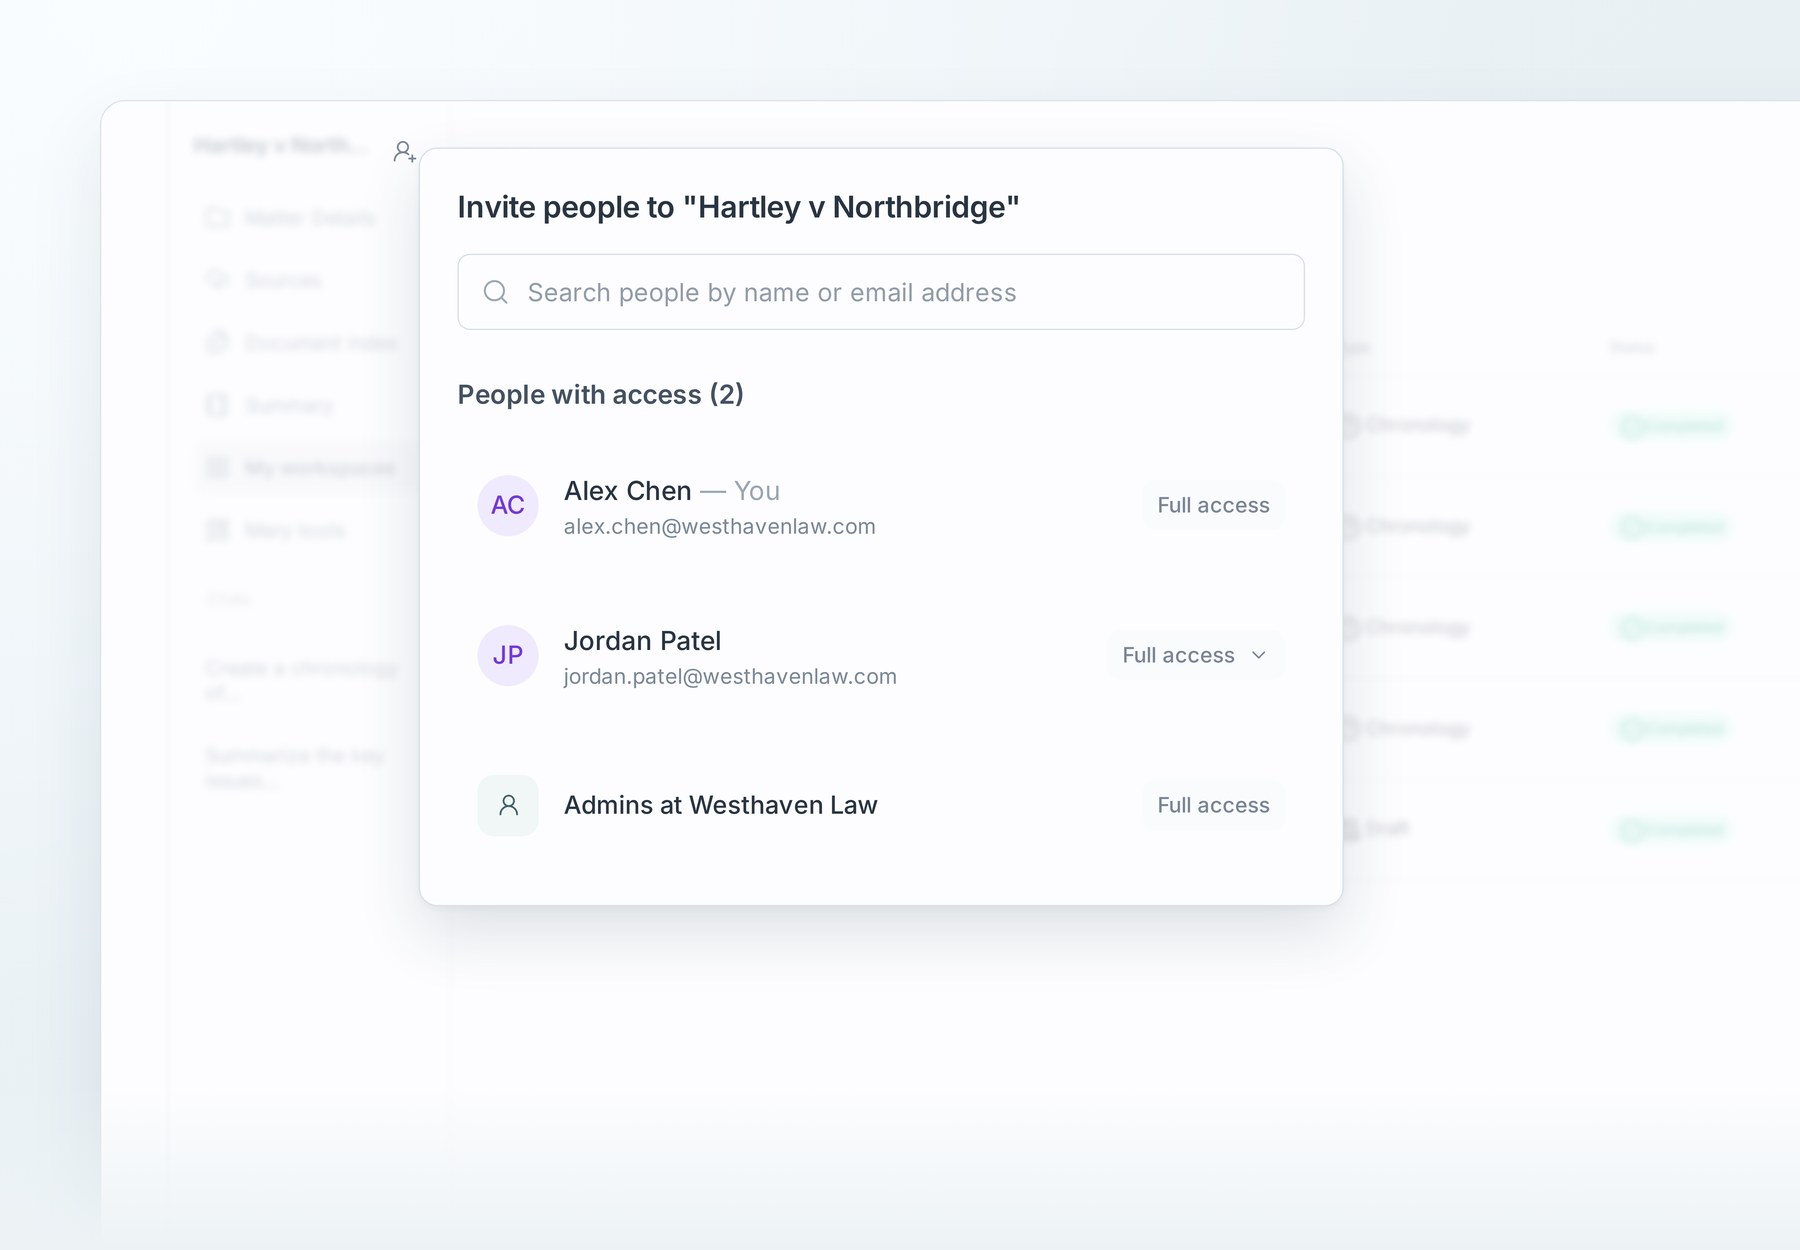
Use the matter's access controls to identify the colleagues who should work with you.
My workspaces identifies the creator of work products. Ordinary editable cells and draft text save automatically and sync with people working on the matter. Agree who will review which work and use notes where a colleague needs context.
Before a person leaves the team, check continuity of access as described in A9. Do not assume that a downloaded file or shared link grants access to an underlying source.
C11 · Connect through MCP
MCP is the connection that lets supported AI applications use Mary's available tools. Your team can work with Mary matter information from a supported assistant after installing the Mary directory listing and authorizing its own Mary account.
Depending on the client and available tools, the connection can support:
Accessing matters within the user's Mary permissions.
Creating chronologies, drafts and bank-statement analyses.
Querying matter documents through Ask Mary.
Viewing and searching outputs such as chronologies, drafts and the Document index.
Viewing supported audit information and exporting available outputs.
Client | Availability | What to do |
|---|---|---|
Claude | Available through the supported connector listing | Enable it under workspace policy where required, then connect your Mary account. Ask for matter information and check the citations and context returned. |
ChatGPT | United States | Install the Mary plugin through the directory and connect your account, subject to workspace policy. |
Harvey | Coming soon | Confirm availability with Mary; the Claude and ChatGPT setup steps do not apply. |
Follow A8 and the Mary MCP guide. Available tools and permissions still apply. The connection does not give another user access to matters your account cannot access.
Support
Use the in-app help control, the Mary help center or support@marytechnology.com when you need assistance.
For a problem on a matter, include the matter name, the affected item or tool, what you expected and what happened. Share sensitive examples only through the firm's approved support route.
Your agreed customer success contact can help with onboarding, a short matter session or training. Send product feedback through that contact or discuss it at a check-in.
Training by arrangement
Session | Audience | Example length |
|---|---|---|
Admin session | Mary administrators | 45–60 minutes |
Team training on a matter | A practice group or matter team | 45–60 minutes, online or in person by arrangement |
Individual matter session | A user with a large or complex matter | 15–30 minutes |
Check-ins | Pilot lead and frequent users | Around 30 minutes, weekly to monthly as agreed |
Refresher or new-capability session | Existing users after relevant releases | Around 30 minutes |
Confirm the sessions, timing and materials with Mary. Where agreed and permitted, a recording can help people who cannot attend. Ask about a follow-up pack with the recording, example prompts and the team's use cases.
Frequently asked questions
Question | Answer |
|---|---|
Is there a limit on users or matters? | The standard model has unlimited firm seats and matters; usage is measured in processed pages. Check any contract-specific terms. |
Does IT need to configure SSO? | For Microsoft firms, complete the administrator-consent flow in A2 and manage the firm's required application assignments and sign-in policies. Google firms use their supported Google route. |
We granted consent, but users cannot log in. | Check that the first administrator completed the firm's organization setup, that the user was invited, and that the account, region, sign-in method and IT assignments match. Ask support if those checks do not resolve it. |
A colleague cannot be added to our organization. | A separate organization or account mismatch is one possible cause. Ask Mary to investigate; do not delete an account or create another as a first step. |
Can I add documents later? | Yes. Add them to the existing matter and check processing. Review proposed updates for supported chronologies and check other outputs separately. |
Who can see my chronologies and questions? | Team Members see their own and shared matters. Confirm the matter's sharing and applicable organization role before sharing sensitive work; use the current access controls rather than assuming a link grants access. |
Can outputs go outside Mary? | Yes, use the export available for the output. Drafts download as Word; table options vary. Check formatting and citations. A recipient needs appropriate access to follow linked Mary sources. |
Appendix
Admin go-live checklist
Use this as a planning checklist. These are items for your team to confirm, not automatic completion indicators.
Mary administrators and IT contact named; administrative correspondence route agreed.
Security review completed using the current Trust Centre documents and firm terms.
Correct regional Mary domain allowed through applicable web filtering.
Microsoft consent and required assignments completed, or the firm's supported Google sign-in ready.
Organization created by the first named administrator using the appropriate onboarding route.
Contracted plan and credits confirmed with Mary.
Users invited, with clear instructions to wait for the invitation rather than create an organization.
Admin roles limited to the agreed core group.
Applicable billing allowance, spending controls and alerts reviewed.
Optional document convention and drafting precedents agreed, if used.
Client or matter AI approvals confirmed for the first matters.
iManage or other required connections arranged, if used.
First matters chosen and documents prepared.
Admin session, team training and check-ins agreed and scheduled.
Your Mary links
Bookmark the links for your firm's platform. Use the onboarding invitation if your region or setup differs from the examples below.
Purpose | Audience / region | Destination |
|---|---|---|
Sign in | Australia | |
Sign in | United States | |
Create the organization | United States; first named administrator only | |
Organization settings | United States; authorized administrators | |
Other onboarding regions | First named administrator | Use the onboarding link supplied by Mary; do not adapt the US URL yourself. |
Help center | All customers | |
Security information | Security, risk and IT teams | Mary Trust Centre; some documents may require normal access approval. |
Support | All customers |
Your factual record, ready to work with
Start with a useful matter, check the sources and build the work your team needs. Keep the judgment with the people responsible for the matter.